So the Tamiya Championship Series for North America has announced their rules. Finally, F1 will allow 21.5/no timing esc in the class, which is a huge step. I realize there are a fair amount of racers who are fans of the 540J, but I hate those motors. Formula one should definitely be embracing brushless technology. While it is as good as class as any to get started in, it's still a challenge for the advanced racer.
I am certainly not a silver can guru by any stretch of the imagination, but I put enough time into it to get decent motors. It's pretty much time I could have used doing something more useful, instead of dynoing overhyped drill motors and interviewing old time 1/12 racers to find out what they where doing in 1982 to Igarashi closed endbell motors.
You could dyno up the brushless motors as the oval racers do, but it's not going to produce the same gains they may see. .05 sec per lap is real when you are doing 3 second laps, but on a 10 turn race track, you have ten opportunities to fritter away a pretty small advantage. Most of the time you'd be better off making your car work better. In the unlimited silver can days, the massive advantage you could gain is worth the work, but the return is not there in brushless trying to hunt down the perfect stator/rotor combination, in terms of raw numbers. The manufacturing tolerances are not as bad a brush motors, from what I can tell.
Looking at what I have seen in 17.5 and 21.5 no timing sedan racing, the vast majority of the speed is in the amount of timing that can be put into the motor. The newer motors like Thunder Power, SpeedPassion MMM, Trinity D3 and Revtech all allow up to and even north of 50* of timing. Most other parts of the motor have been specified, so timing is where the bulk of the advantage is gained. I came to believe this due to a race I had with 21.5 "Gt" style touring cars. One racer showed up with the new Thunder Power motor, which was indeed very fast. I had a Novak Ballistic in my car, and I had a hard time keeping up on the straights especially. The secret of the Ballistic motor is that there is no mechanical stop in the endbells timing ring. Novak provides a sticker on the motor to show the timing range up to 45*, but nothing stop you from going past. So i just thought, "What would happen if I went past the sticker?", as I had no other reason to think the TP motor was faster except advanced timing. Sure enough, exceeding the timing sticker by about 2-3mm produced the desired speed with no discernible ill effects.
The bigger issue is the allowance of "any rotor" in the rules. There are 2 ways to go in my opinion, if you are thinking of experimenting. One would be a smaller diameter rotor to get more rpm. This will also produce less torque, which may be an advantage in outdoor situations where traction may be at a premium. The other would be a bigger rotor, and advanced timing to bring the rpm back. At an indoor facility, this could be an advantage on high traction. I have seen this combo work in 17.5 sedan, i know it could be feasible.
As far as a starting point for a 21.5, 66-67mm rollout on a small track is a decent start. On a bigger track, 70mm would be appropriate. This is with a lot of timing advance on a Ballistic.
As far as what ultimately, will be the best motor, I don't know. I know there is a perception that the Thunder Power and Trinity/Revtech products are very good, but I have had the above experience with the Novak, and I have also seen some ridiculous Speed Passion motors recently as well (with 40 or 50* sensor boards in them). More than anything, the main factor would be possibilities with the rotors, if it pans out...but until somebody puts the work in, I think that pretty much anything with a boat load of timing will be serviceable.
Monday, December 19, 2011
Saturday, December 17, 2011
Wicked Wide 104
After a few weeks of rubber tire racing, I brought out my foam tire F104 from last winter with a few key modifications. I was being subtly "encouraged" to run foam tire by one of the guys who was running a wide Exotek car on foams, so I thought I would bring my car out with a few things I had been wanting to try out.
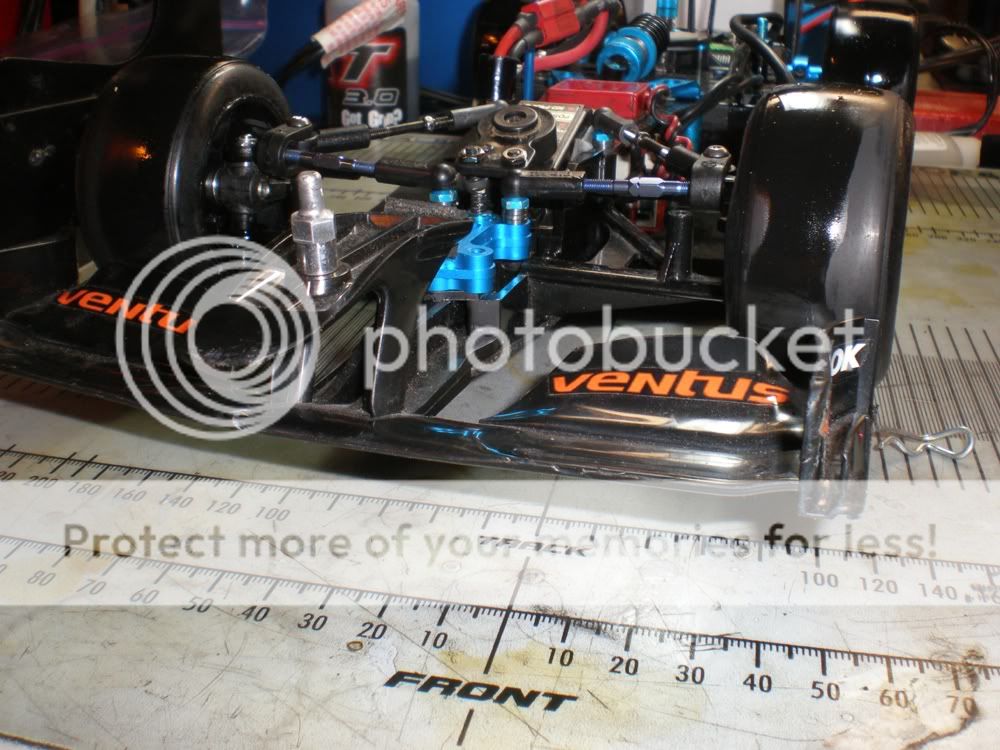
 I built up a link style front end using a 3Racing lower arm set to start with. You can also use the Tamiya link style lower arm as well, but it is a few millimeters narrower than the 3Racing part. I wanted to go for a wider front end, so 3Racing it was. Luckily, the Tamiya F104 camber plate will fit right on top of either of these arm sets, and it is perfect for the two ballstud locations you will need.
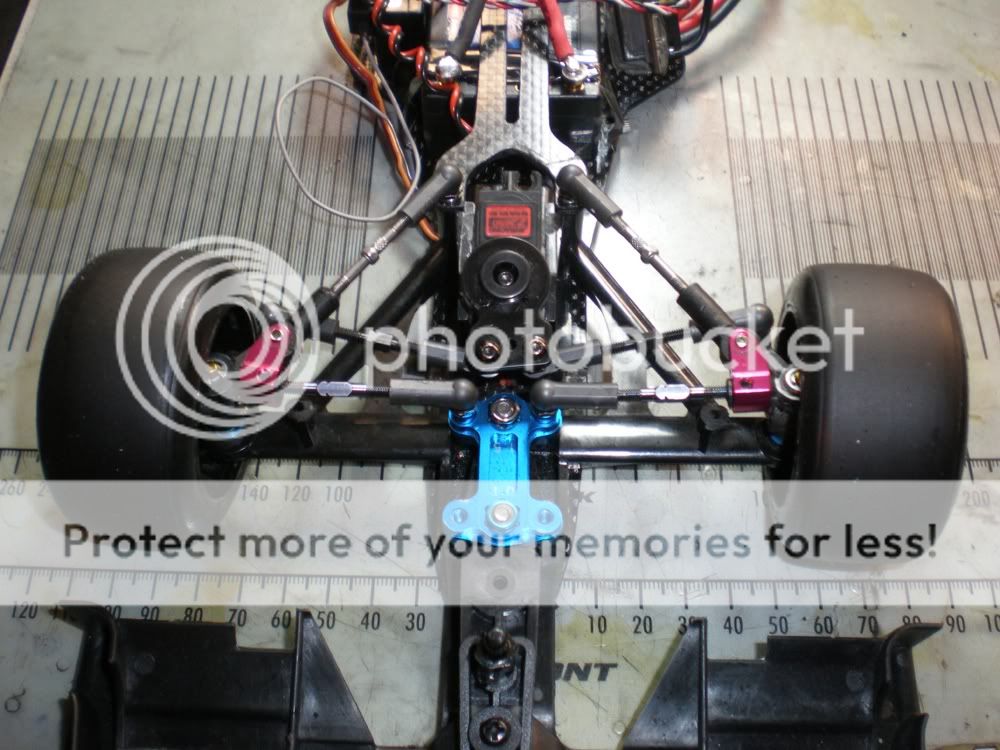
 The arrows point to the link locations, The forward link is just a Tamiya ballstud with no spacers. The rear link has 4.5mm of shims to create some active caster effect, and also to create the proper angle as this is the link mainly controlling camber. The front link has more effect on caster, but both links affect each other, and you have to keep an eye on both adjustments as you are setting the front end. 0-.5* camber is a good start, and around 5* caster was good for me. Remember too much caster can make the car want to kind of stop mid corner if your car is soft at the tbar...and this was the case when I first put the car on the track.
 Another angle of the front end...you can also see here that I'm using the Tamiya Indy car rims, which are bigger in diameter. They are closer to a 1/10 pan car rim. They are discontinued, but they can be found if you look around. 1/10 donuts work well on the rim, and they also allow the use of the F104 kingpin and ride height spacers. You may be able to see that I used 1.5mm of spacers on top of the arm to keep it fairly level. Moving the spacers under the arm would make the car pick up some camber in roll, and thereby front grip.
 Here the center screw has been removed from the t bar for added flex and grip. Basically, this moves the pivot point of the t bar quite a bit forward. This also gives the car more rotation as it can twist a bit more. The kit stock black t bar is stiffer and works better for foam when you take the screw out of the t bar.
 The arrows here point to the foam spacer that I put on the t bar. The foam spacer is glued to the top of the t bar to provide a way to keep the ride height and a pivot point.

Since I was using an 1800 mAh micro car pack, I moved the receiver to the middle of the car. I wound up with the esc still on the radio tray, so teh arrow shows where I used 1/2 oz. (14g) of lead to re balance the car. You'll also notice the oversize Indy car rim.
I more or less left the car with the setup I used for the Harbor Hobby TCS, outside of the front end and tires. Amazingly, it was extremely quick right away. I did have to take some caster out, but that was about it. It had a ton of grip and steering. The t bar without the screw is a huge factor, and it is the only way I would run the car outside of TCS rules.
Thursday, December 8, 2011
Exotek 104 on Pit rubber

In contrast to my "F103.5", I could throw the car into the corner. It does have a bit of a push on turn in. This makes me wonder if the front end setup is what is keeping the car from flipping. A long time ago a good sedan racer told me the car is fastest when it's about to flip off the track. Maybe there is just a tradeoff with rubber tires that some steering has to sacrificed to keep the car on the track. ????

Gold springs..still running 35 wt oil/3 hole and a red florescent mini car spring.

Wednesday, December 7, 2011
F103.5


This is again an F104 lower arm, with the camber plate directly on top of the arm. Xpress parts are used to control the caster, and as the upper eyelet on the kingpin. 35mm turnbuckles for all links are a good size if you want to set up a front end like this. Everything else is from a 104 front end. Generally, 1* camber or less and 6* caster are a good place to start, with black springs. Ride height should be at the minimum legal.
I should point out that I like to try to control the roll of the car at the t bar. Rubber tires are heavy, and i think that they require a bit more roll stiffness. To that end, I have been using the standard t bar, with a .5mm metal shim on the forward screw, and an .060" nylon washer at the rear, with the large outer o ring from an F104 t bar around the washer. I was trying to limit the movement of the T bar without making it solid or too stiff. The car's short length makes it prone to traction roll at times, from the small amount of running i have done with it. Taking a stab at things, I did try both OFNA Diff Lock and 100,000wt diff oil on the damper plates. The OFNA lube, which is like glue, made the car do some strange things, like pirouettes... Anyway, 100,000 wt may have been better, but I cut a tire sidewall and the car was looping out randomly. I'm not sure how to handle the t bar setup with this car yet. I may just throw everything out the window and run the car soft with minimal caster. Caster is a problem if you run too much in a high traction situation, since it cross weights the car and induces even more roll. So as the car wants to traction roll, you have to take caster out.
The first night i ran the car, it was actually pretty good, and the week I had to think about it may have just resulted in some over thinking. It probably just needs a solid practice day to get an idea of what it likes and it will be very good.
Randy Willard's TRG continuing developments..
I had a chance to work with Randy's TRG car in the 180 mm format with rubber tires. Randy asked me to look at what we could do to get the car a little better. It was ok, but it needed some TLC so we could get it fast for carpet.
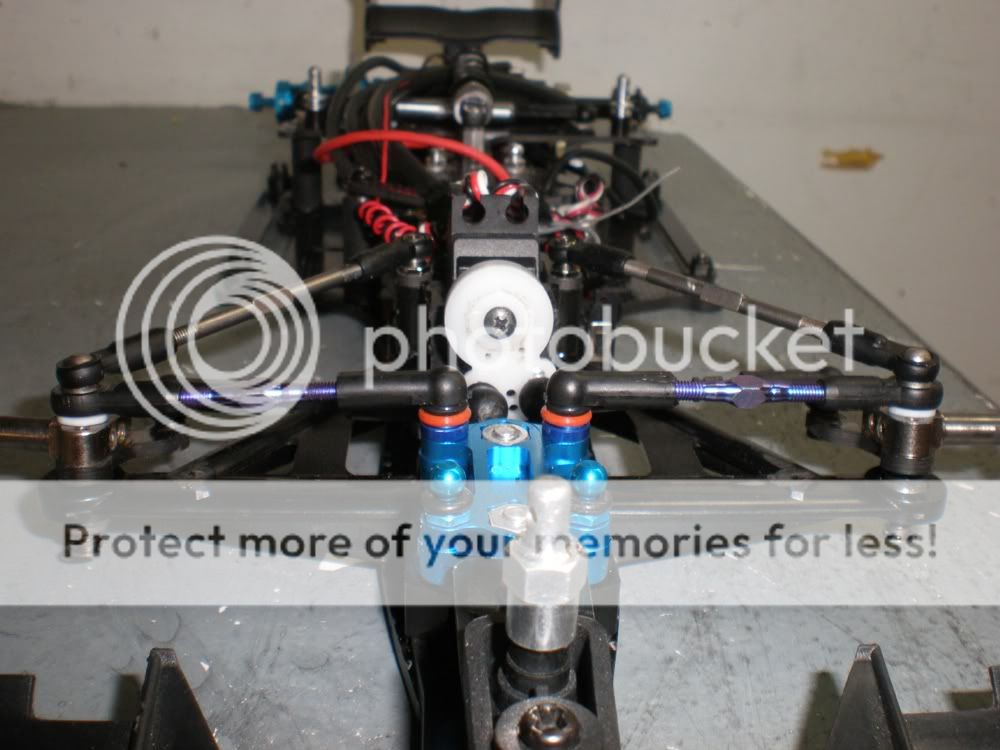
First I changed the front end links to be closer to the F104 front end i have been working with lately. I had originally helped get the front end setup for the modern narrow style, but the 4 links all connected to the camber plate. I find that the front end is easier to set up with the caster link extending back to the servo mount. This makes the camber and caster links affect each other less as you adjust the front end. Otherwise, each setting keeps changing as you adjust the other.

A side view of the link setup. There is a fair amount of caster in the car. Note that as you add caster and camber, it will create steering, and traction roll issues, too.
 Originally, Randy had the long, green fiberglass link on the car. This was very soft, but great for outdoor racing. After we tried the shorter, and slightly stiffer green fiberglass link, the even stiffer black side link was settled on. The shorter links don't allow as much articulation, as well as being stiffer. I eliminated the o rings from the setup as well, substituting plastic washers of a similar size to remove even more compliance. Rubber tires are heavier and seem to want a stiffer side to side suspension. The links are cranked down for maximum stiffness. This also limits the travel, which I think helps keep traction rolling to a minimum.

Initially, I did have some traction rolling. Reducing camber to under 1* and reducing caster brought the car to a very drivable state. Caster is probably 6-7*, but I didn't happen to measure it before I gave the car back to Randy. The camber plate is also set to the "1.0" position, so the overall link length is short, which helps to get some roll out of the front end of the car. The shock has 45 wt Losi oil. I'm not sure if it is the shock's smaller diameter, but it felt better with a slightly higher weight oil than I usually run (35wt). Randy had loaded the TRG damper with a heavy lube, not sure what it was, but I just checked it and made sure the grooves iun the damper were filled and it seemed spot on. The grease felt about the consistency of diff ball lube, and the car felt good, so I left it.
First I changed the front end links to be closer to the F104 front end i have been working with lately. I had originally helped get the front end setup for the modern narrow style, but the 4 links all connected to the camber plate. I find that the front end is easier to set up with the caster link extending back to the servo mount. This makes the camber and caster links affect each other less as you adjust the front end. Otherwise, each setting keeps changing as you adjust the other.
A side view of the link setup. There is a fair amount of caster in the car. Note that as you add caster and camber, it will create steering, and traction roll issues, too.
Initially, I did have some traction rolling. Reducing camber to under 1* and reducing caster brought the car to a very drivable state. Caster is probably 6-7*, but I didn't happen to measure it before I gave the car back to Randy. The camber plate is also set to the "1.0" position, so the overall link length is short, which helps to get some roll out of the front end of the car. The shock has 45 wt Losi oil. I'm not sure if it is the shock's smaller diameter, but it felt better with a slightly higher weight oil than I usually run (35wt). Randy had loaded the TRG damper with a heavy lube, not sure what it was, but I just checked it and made sure the grooves iun the damper were filled and it seemed spot on. The grease felt about the consistency of diff ball lube, and the car felt good, so I left it.
Wednesday, November 23, 2011
The poor man's F1R
One thing i did not mention in my last post was that I tried my home brew F1R style top deck. I made it from some fake graphite- basically 3mm fiberglass with a graphite veneer on each side. I have a big sheet of it laying around, so it was fine for this. There are 2 extra holes in the original Exotek chassis, so I also incorporated these into my upper deck so there could be the choice of 2 or 4 posts on the car.
Running the car last night, it was traction rolling, so I wound up putting the full long upper deck back on to make sure that the cause of the traction rolling was not the chassis stiffness. I do think that this sort of thing will be great for lower traction racing like asphalt.
Running the car last night, it was traction rolling, so I wound up putting the full long upper deck back on to make sure that the cause of the traction rolling was not the chassis stiffness. I do think that this sort of thing will be great for lower traction racing like asphalt.
Talking turkey with the link front end
I finally got out to my local track on a Tuesday, as the F1 class is becoming very strong every week. This week there were I think 7 cars, which is good since there were basically zero about a month ago. It's pretty loose, since there are F103s, 104s, F109s, a TRG car all different widths, most on foams (except me)...
I decided to run my F104/Exotek with the adjustable link front end and Pit rubber tires. The traction really came up since the track has been operating at full steam for a few weeks. My car was really flipping off the track everywhere. Mostly, it was too soft on the side springs, and the front end had too much bite. I could see the rear tires wanting to lift, but I also saw the car soft of diving onto the outside front as well. Not good.
First I glued the side walls of the tires, which was helpful, but not enough. I took a bunch of caster out of the car, to the point to where it only had a couple degrees, and went to about .5* camber as well. Still flipped. Raised the camber link to level it off. A little better, but would flip when pushed hard. Upped the side damper oil to 60..this helped, but the car was on the edge of rolling and had to be babied.
The 2 things that got the car driveable: Gold Associated side springs, and going to 3.5mm ride in the front end. The front end was way higher than it should have been. The gold springs kept the car from twisting itself over, especially in the sweepers. Now this did take away a bit of steering/rotation, but the car remained pretty flat. I was able to race all over the track, albeit with a bit of an entry push. Some of this may also be due to the fact that I went to a shorter upper link setting as well (explained later) I knew I could drive with confidence as far as the flipping issue, so even a bit of a push was ok. After the races were over, I added some caster back in and this brought steering back I think I could have increased front dope as well, from the 1/2 tire I was doing. The gold spring may have been too stiff as well, since the car didn't get into the corner too well. Unfortunately, I was pressed for time, so not all the adjustments were tried.
So in a nutshell:
To reduce traction roll-
Glue side walls of tires
Lower car to minimum
Stiffen side spring
Shorten upper arm
Reduce caster
Stiffer front spring
Finer tuning-
increase side dampening
flatten upper arm
Shorten shock
Also remember that the camber adjustment plate is the way to shorten and lengthen the upper link on the front end. 2.5 is the longest link, 1.0 the shortest on the aluminum piece. 2 is longer than 1 on the plastic, but both are shorter than 1.0 on the aluminum part. A longer link increases roll on the front end (and traction, hence the traction roll). Going to a shorter upper link when traction comes up is a good idea. The shorter upper link should make the car react faster as well.
Thursday, November 17, 2011

Wednesday, November 16, 2011
It's been a while...
I gotta get back on the ball over here...
Meanwhile, check out the beautiful end of season book UF1 has put out detailing this year's racing in their series.
Meanwhile, check out the beautiful end of season book UF1 has put out detailing this year's racing in their series.
Monday, October 10, 2011
Pics from UF1@IIC
Holy crap...Charles Lightfoot's pictures are awesome!!!!
\http://uf1series.com/_gallery/gallery_25.html
\http://uf1series.com/_gallery/gallery_25.html
Sunday, October 9, 2011
IIC VEGAS F1 info...
Thanks again to RC50.com for posting this ....
1st qualifier Hayato Matsuzaki: http://www.rc50.com/modules.php?name=coppermine&file=displayimage&album=67&pos=774
2nd Hiroyuki Kasuya: http://www.rc50.com/modules.php?name=coppermine&file=displayimage&album=67&pos=773
3rd Viktor Wilck: http://www.rc50.com/modules.php?name=coppermine&file=displayimage&album=67&pos=772
4th Marc Rheinard:http://www.rc50.com/modules.php?name=coppermine&file=displayimage&album=67&pos=771
5th Dave Berger:http://www.rc50.com/modules.php?name=coppermine&file=displayimage&album=67&pos=770
6th Ryan Borgheiinck: http://www.rc50.com/modules.php?name=coppermine&file=displayimage&album=67&pos=769
7th Francesco Martini: http://www.rc50.com/modules.php?name=coppermine&file=displayimage&album=67&pos=768
8th Tsutomu Arakawa:http://www.rc50.com/modules.php?name=coppermine&file=displayimage&album=67&pos=767
9th Scotty Ernst: http://www.rc50.com/modules.php?name=coppermine&file=displayimage&album=67&pos=766
10th Mike Kennedy: http://www.rc50.com/modules.php?name=coppermine&file=displayimage&album=67&pos=765
RC50.com's F1 pix from Vegas
So you don't have to go find them....Nice job Nashracer..
http://www.rc50.com/modules.php?name=coppermine&file=displayimage&album=67&pos=598
http://www.rc50.com/modules.php?name=coppermine&file=displayimage&album=67&pos=599
http://www.rc50.com/modules.php?name=coppermine&file=displayimage&album=67&pos=600
http://www.rc50.com/modules.php?name=coppermine&file=displayimage&album=67&pos=601
http://www.rc50.com/modules.php?name=coppermine&file=displayimage&album=67&pos=602
http://www.rc50.com/modules.php?name=coppermine&file=displayimage&album=67&pos=603
http://www.rc50.com/modules.php?name=coppermine&file=displayimage&album=67&pos=604
http://www.rc50.com/modules.php?name=coppermine&file=displayimage&album=67&pos=605
http://www.rc50.com/modules.php?name=coppermine&file=displayimage&album=67&pos=625
http://www.rc50.com/modules.php?name=coppermine&file=displayimage&album=67&pos=628
Friday, October 7, 2011
Interesting pictures from RC50 @IIC

Edit: looks like this was Scotty Ernst's ride for the race.

What about this partial Exotek F104? Looks like there have been more than a few modifications to the base kit....
Pictures from RC50.com
Monday, September 26, 2011
Thursday, September 22, 2011

Tire wear video
This is just a quick illustration of the difference in tire wear when 4 oz (112g) of lead is added on the radio trays.
Friday, September 9, 2011
Thursday, September 8, 2011
Sunday, September 4, 2011
More TCS finals to come...
I have been a little busy lately, but I do want to post up some pictures of my rear tires so you can see the difference in tire wear from the addition of lead to the car. It's fairly dramatic. I also have a bit of video from concours- there were some very nice cars out there. Lastly, I'm going to do an overview on what I was doing with the car at the race. It's not really far from stock, but hopefully it will show things in an easier to follow way.
Wednesday, August 31, 2011
TCS Finals
It was a pretty long week. At the same time, it was a 100% different experience than last year. By the time qualifying started, I was really confident in my car. One thing that was different was having a better awareness of tire prep. In the beginning runs, I was using Simple Green to clean the tires, which does work very well. The only thing I did notice was that it was not as good on longer runs, the tire would tend to overheat a bit. Oddly enough, Buggy Grip to clean and SXT 3.0 heated up with tire warmers was really good any time of the day. It also ran as long as the battery lasted. The only caveat to this was the fronts. I ran new rears each round, which was great. I found they actually ran the best for about 3-4 runs, then traction began to drop off, but for the nationals I just ran new skins each round.
The fronts were actually broken in, and could be used for many runs. However, as I found out the hard way, the insert has to be monitored to make sure it is still in good shape. I basically threw away rounds 2 and 3 because the fronts I had been using became very soft as the inserts started to break down. The car became very unstable, and was pretty hard to drive. As soon as I went to a less used set of fronts, the correct feel came back and the car was very good. Just keep an eye on the fronts, and especially watch for the death groove.
Another big issue was lead weight. A little discussion has already occurred on RcTech about Austin Brumblay's lead setup. I noticed his car looked like it was kind of hard to drive in Q1, which allowed me to Tq the round, despite his very fast initial pace. From what I could tell, the lead showed up in Q2, and his car was VERY dialed from that point out. In short, he cantilevered the lead out sideways from the radio trays, and stacked lead up (6+ oz.). This was more like a 103 with the battery sideways in terms of weight distribution. This added weight transfer really worked for him. After seeing how good his car was, I added 4 oz. (as much as I had, LOL) to my car in a similar fashion. What was interesting was not the fact that the car became much more stable- in fact I had to add 30 points of dual rate to get the steering back. What was more interesting was the tire wear on my rears was much better. Without the weight, the rears grained pretty bad, and I'm sure the car broke the rear end loose quite a bit. After the weight, the tires came back in almost new shape.
For asphalt in general, I can't recommend this more. I haven't run it enough to monitor improvement in the number of runs on a tire, but I would imagine there should be a couple more before the tire is slow.
Before any of the racing started, I did show my "lowered" front end setup to race director Fred Medel, who shut me down immediately, LOL. I was sort of expecting it, and Craig "Cuda" Hammon warned me it would probably be thrown out, as they were pretty harsh on creative setups at the last couple races. It worked out fine though. I did use a short Tamiya ballstud on the camber plate to get a bit of the angle back into the upper arm, but they seemed ok with that. I was allowed to run the shorty servo with the output shaft facing up and forward as I have in the past. This was ok since no parts were cut or altered. I ran black front springs, which was fine until I put the lead on the car. Looking back, I could have run gold or even softer, since I needed steering. Austin B. mentioned on RcTech that he used gold springs with AW grease, which sounds just about right, and his car was great.
I'll probably have more in the next couple days, but for now congratulations go to Austin Brumblay TCS NAF winner! I'm sure he'll be issuing beat downs in Japan...Also congrats to Anthony Fung in 2nd place, and thanks to my rc.F1.blog team pit buddy T Marshall. The rc.F1.blog team managed to qualify 2nd and 4th, and I got to the podium in 3rd, which wasn't too bad.
Monday, August 22, 2011
Pre TCS Nationals
I arrived at the Tamiya facility early Saturday morning to get some testing in. After last year, I waanted to get a handle on things early. I had not planned to come out so early, but some friends urged me to do so. Luckily I was able to change my flight (and actually get a better price!!) and come out early.
Just some quick thoughts:
*The track like last year doesn't have a ton of traction. However, it seems a little stiffer chassis is working better as I thought. There is a limit to this, but stiffer helps the car have a better feel out of the corner.
*Simple green!! LOL
*Maxing out the front ride height may not be the way to go. I was trying this to help stability, but it may be making the car hard to drive. Essentially, the roll center raises with the ride height due to the fixed arm, so
too high of a ride height may make the car too reactive...
*I am a big dummy dept: The plastic camber plate is 0 and .5 camber, I guess. I did not realize this, but using a caliper, the 1 position has the holes ~21mm apart, 2 is ~20mm, and 1.0 on the aluminum piece is ~19mm. Closer hole spacing = more camber...........
Tuesday, August 16, 2011
F104X1 Carbon lower deck?
Just a quick thought, I have been thinking about trying the carbon lower deck vs. the FRP that comes with the car. As I alluded to in my previous post, the car was better with two chassis post installed all the way forward. I'm wondering how a carbon chassis with no posts installed would be, maybe a medium between no posts and posts on an FRP chassis. It's food for thought....
Monday, August 15, 2011
F104X1 panic at the racetrack
So Sunday I was trying to get some last minute testing in at the local track before setting out for California and the Tamiya Nationals. There was a bit of rain during the day, and I had a lot to try out, so I was scrambling a bit. Not to mention, there wasn't an F1 turnout, so I was trying the car between rounds once practice ended.
A couple quick things that stood out to me:
One thing that I had used in the past on the F103 was the shorter kingpin setup that traps the spring between the top of the steering knuckle and the upper arm on the standard front end. Usually, the spring rides under the lower arm. I can't remember the Tamiya part # or the name, but it's very close to how an Associated "old school" front end is set up. The main point is, it seemed to produce a bit of preload on the spring, and I even added shims at times to increase the preload. The car has a more stable feel, especially entering the corner. This was helpful with the 103 on foams.
I was trying some "sag" or droop on the front end of the 104 by removing a .5mm spacer. That did add some on power steering, but it came with a less than predictable steering feel. Going to a extra .5mm spacer over standard (.5mm preload) gave a very confident steering feel. The relationship of the steering wheel to how the car turned was very proportional, very linear.
I also changed the steering links to the forward hole in the steering arm. This does two things, changes the ackerman relationship, and also speeds up the steering. Mostly I wanted to change ackerman, but I didn't want to move the servo. It was easier to have an extra set of links. I think that it helped the car get through the turn a little better because of less wheel scrub. Now, what I'd really like to do is set the servo to have straighter steering links (mine are currently very angled) and also go back to the rear holes in the steering arm.
Another positive result was adding chassis posts in the forward most holes. My car had a bit of a loose out of the corner/under power condition. I remember I had tried the posts before at the Memphis race, and it tightened the car up a little after turn in. So I added the posts, hoping it would help. They actually did tighten the car up a bit where I needed it, coming off the corner. Memphis was pretty high bite, so the posts were not needed there, but the local track facility's beautiful euro style road course is literally 20 feet from their off road track. This does tend to throw some dust on the road course unless there is a ton of cars on the track and a lot of sugar water.
Overall, progress was good. I would have also liked to have tried increasing the center shocks angle, as it usually stabilizes the car, but it wasn't super important since I have tried that adjustment several times before.
Side damper oil was also increased to 10000 wt diff oil to aid in stability as well, but that is a pretty well sorted adjustment.
One other thing was that straight Simple Green to clean the tires seemed to have the longest "run" on the track before the tires got dirtied.
Sunday, August 7, 2011
F104X1 front end thoughts...
Due to a couple big events this weekend, there was no place to run my car. The only on road race was at a hobby expo, and they didn't offer F1. Luckily, the shopping center where one of the local hobby shops is located just had the lot repaved, so I was able to fool around with a few things. I was trying out different ways of tire prep, but I did have a chance to play with the front end a bit.
My car did oversteer generally. The first move I tried was to set the camber to minimum by going to the 1.0 setting on the camber plate, but keeping camber gain in the car by raising the arm up at the kingpin. This was a pretty good compromise, but I was still not there.
My car was a little loose on corner exit. One way to cure this is to raise the front end. I raised the front end to the maximum, removing all washers from under the knuckle. This definitely helps to settle the rear end down, but in effect you are raising the front roll center. That, coupled with the rear end being as low as possible, creates a situation where the car turns in, but now is prone to pushing more mid corner and exit. Obviously, I want to keep the positive aspect of a more stable corner exit, but I want to get some of the push out. The problem was that it began to rain a bit so I had to cut my session short. I would have liked to lower the shock to a more horizontal positon to get a little more on power steering. One other possibility would have been going to the gold front spring from the black to let the car roll a little more, but I'm not sure if it would be too much.
Tuesday, August 2, 2011
Sunday, July 31, 2011
F104X1 First day on asphalt
I got a chance to run my car on asphalt for the first time today. My initial thought was that it actually understeered a bit. This may have been due to the tire treatment. I was trying to actually use an oil type additive, but after the warmers came off, I re cleaned the tire with buggy grip. This seemed to clear up a lot of the issue with the tires feeling "greasy". The car actually was fairly locked down.
I was also using 28g of weight on and around the servo. This is an idea based on the new 1/12 layouts using the battery lengthwise in the car to get more weight in the nose area to promote more on power steering and a bit less twitchyness. It's like putting a case of water in the front of a shopping cart. It doesn't change directions so fast, but it goes once you are committed.
Anyway, I started to increase the angle of the upper arm by lowering it at the inside by 1mm, and on subsequent runs, raising it at the kingpin by .5mm. I also went to 2.0 camber. This made a lot of off power steering, but it didn't turn that hard on the throttle To help this, I went the yellow spring, from the red. Again, it was helpful, but not a huge difference. Lowering the shock ballstud by 1mm did get the car steering a little more as well.
Adding 1mm to the reactive caster (placing the shims under the rear upper arm ballstud) again got the car turning more off power, but didn't help the on power much at all.
Raising the front ride height 1mm did actually seem to help a bit. I sort of think the car could roll a bit faster with the nose up. I'm not sure about this, so I'm going to have to try it a little more. It did seem promising.
One other thing I did have a chance to try was changing the damper tube. I started with 5000 diff lube, and went down to 2000. The car had quite a bit less dampening, and it also had more response. It was a bit hard to get a really good handle on this, as I had a set of tires starting to go off when I did this, and I went to a newer set on the next run. I'm tending to think it may be better off to actually run a little stiffer lube when there is less bite to the car is calmer. Obviously, this only holds true to a point, but 5K to 10K should be ok. I would say start with 5000 and go from there.
Overall, the car was a little on the push side, but I could drive it fairly hard and not have to worry about it spinning out or acting funny otherwise. I did identify an on power push, but this car may require a harder spring and or shock oil setup, since the damper disc acted in all directions, vs. the tube which only affects side to side movement.
It was a bit hard to play around with too much more, as the race was a local series race that had around 70 entries. Track times was a bit of a premium, but I'm going to try to get more practice this week and work through some of the issues.
Sunday, July 24, 2011
Exo104 and 104X1
The weather has been weird around here lately. Hot, crazy thunderstorms, everything changing every 15 minutes. With that being the case, it was time for a trip to the carpet track.
I wanted to shake down the 104X1, and also fool around with my Exotek car. I got a hold of some of the Pit tires last week (R-1 and F3-S), so it would be a nice time to try them out on carpet. Luckily, the layout has been down a couple months since its summer. There are at least a few guys practicing every week, so the traction was ok.
The Exotek car was pretty good to start with, but it didn't quite rotate enough, and had a bit of a mid corner push. I changed the ballstud on the rear of the upper arm from a short Tamiya to the standard Tamiya, which is about 1mm higher. That helped to get the car turning mid corner, but it picked up a traction roll if I cranked the wheel too hard in the sweeper. Reducing camber to 1.5* helped a little, but I wound up changing the 3.5 mm offset steering arms for the stock parts. This helped since I was able to take throw out of the radio, and the car transitioned side to side way better. Basically, the car had more steering with less throw, so it wasn't diving onto the outside tire so hard and traction rolling.
At this point I threw the Pit tires onto the 104X1 just to make sure it went in a straight line, steered ok, and just to see what it drove like. I was actually surprised at how good it was. It wrapped the corners a little better than the Exotek car, and had quite a bit of off power steering. At the same time, it pushed if you got on the throttle too quick, and it didn't have the overall front grip of the Exotek, nor was it as easy to drive.
I took one of the 1.5mm washers out from under the rear shock ball stud, making the shock a bit flatter. That made the car better on power, but also took away a bit of rear grip.
After all that, I looked at my Exotek car and made a few changes to get it closer to some of the things I liked on the X1. I went from 50wt in the side damper to 35wt oil, and from red CRC side springs to whites, one step down. I measured the front caster on the X1, and put the Exotek car at about 7*, or as close as I could eyeball with my camber gauge. I also lowered the front ride height 1mm.
This really helped the car wrap the corners much better. It was fast but really easy to drive. The only thing you had to be aware of was not totally sawing the wheel hard in the sweeper. Some of that may just be the nature of the beast, in that the car is so narrow. I also noticed the car was only making a few small chirps in a couple corners, so it was using the tires without sliding them. That was one thing about the X1, it was making a lot of tire noise.
Another small but significant change was the servo saver. I was using a small Kimbrough, but it had a crack on the edge of one of the ballstud holes. It broke when I got into a tube, so I replaced it with a Kimbrough Medium (they are black, and come with inserts for different servos). The ball stud holes are are further apart, and a little farther away from the center of rotation. This repair was the only change before I went back out on the track, and I noticed the car had more steering without upsetting any other part of the setup. I had tested out all 3 sizes of Kimbroughs, and the big Tamiya horn last summer with the servo positioned per the manual. I hadn't gone through that test again once I started to run the servo with the output shaft facing up. Last summer the Kimbrough Medium had the most steering, and also produced better lap times (I had a hard time believing there was a difference, but there it was). Once again, the Kimbrough Medium was an improvement.
I ran the X1 one more time, just to compare the two cars. The X1 was definitely fast, but a little more on edge. As I said above, it made a lot of tire noise, and with the shock a little more level, you could tell it was sliding a bit in the sweepers. I think some of that could be remedied by playing with the o rings on the T bar, maybe running only one o ring vs. the inner and outer o rings. The car did have a very good feel, and was shockingly close on setup. With a few changes, it will be really good. I'm going to try to get it out on asphalt ASAP with the Tamiya tires to see where it really stands, but so far, so good.
Thursday, July 21, 2011
F104X1 assembly rundown

I got a chance to work on the X1 car today and get things pretty well finished up. I have a few spots where I did some things different from the manual based on how I like to set up my current F104 for rubber tires.

I chose to use the Heavy Pivot Post as I have been using for a while. Generally, more weight is going to be helpful for rubber tire in all but the most high traction situations. As you can see I'm also not going to run any chassis posts. I feel like the car is better on bumpy tracks, as well as making more traction. One thing I did notice was that adding posts tended to tighten the car up, which sounds the opposite of taking away traction. To make a better explanation, the car would turn in but not finish the corner well. Without the posts, this went away.


Tamiya includes carbon graphite plastic parts for the pod. The parts are very light, in fact 13g vs. 26g for the aluminum pieces from the black car. They also include an aluminum motor spacer to help cool the motor. I do like the idea of saving 1/2 an ounce of unsprung weight on the pod, but for me cooling was a bigger factor. Running a silver can motor for TCS races makes the aluminum parts more desirable, knowing the motor will be running 150-160 F if everything is right. The idea of a plastic motor mount at that temperature is less than inviting. The other problem is that with a silver can, which has a very short output shaft, the pinion will not reach with the included aluminum motor spacer. I tried to attach a long shank Spec-R pinion, which I use just because the silver can shaft is short, and it still did not line up properly. I tend to think that this setup was designed more with brushless in mind.

This shot has the diff as well as the side damper which is one of the new features on the car. The side damper is of high quality. It built easily and needed no extra cutting or modification. Sometimes, the dampers with 1/12 kits require you to cut or resize the damper, but this was super easy to deal with. I put 5000 wt diff oil on the damper to start, since it's really an unknown at this point. I have been running with no damper at all, and that has worked great lately. I'm excited to see how the car works with the damper affecting roll only, which is the standard in 1/12 and WGT these days.
There also are some other nice options with the car. The Short Black spring set comes with the car, so you have all three shock springs with the kit. The aluminum camber plate comes with the car as well, not to mention the aluminum servo saver horn, both in the sweet gunmetal finish.
The diff is also assembled to my preference. I like to use the one piece thrust bearing instead of the standard bearing included in the kit. The one piece is the same as the F103 thrust bearing, and it is a direct drop in replacement for the standard bearing from the kit. I think it makes the diff smoother, and it should also last about forever. Standard bearings are not meant to be used as thrust bearings....

For the diff itself, I always use Associated silicone grease. It may not be a huge deal, but I have had good success with it. In addition, I sand the diff rings with a medium paper like 400 or 600 to help give the rings some bite and create good diff action. I like to use a plastic diff hub to sand the rings in a figure 8 motion on glass or another flat surface. You can use an aluminum hub, but I have plastic ones laying around, and I don't dirty up the nice aluminum parts.

Here's a decent shot of the new counterweight setup. The counterweight rides on two normal bearings, but there is a shim with a small tab that goes between the counterweight and the bearing in the pod on the steel axle. I'm not sure if the shim is supposed to help get the counterweight spinning to provide a gyro effect or what exactly the deal is. Eventually, we'll find out at the track...

The 3.5mm offset front axle is a popular upgrade for rubber tires to make the car a bit easier to drive. One problem is that the axles come apart if the very small screw holding the metal to the plastic unscrews itself. I like to glue the axle into the plastic, and then add some glue to the screw's threads before fastening it. This has been a good method to secure things permanently!
The camber plate is also in the lowered position I prefer. There are several posts on the front end setup I like on the blog if you are interested, so I won't rehash that here.

As I said when I started the post, this is just an initial rundown on the car. The biggest changes seem to be the damper and the counterweight, and both are going to be big unknowns until I get the car to the track.
Wednesday, July 20, 2011

Monday, July 18, 2011
Randy Willard's "Vegas" edition TRG111

In anticipation of the Vegas IIC race's F1 class, this the the TRG111 of Randy Willard with some mods to make it legal for a 180mm wide "realistic" class. Mostly the front end uses F104 lower arms and mounts the TRG suspension on top, including steering arms and kingpins. Other mods include changing the rear end to a single damper tube and lowering the center shock.....
Sunday, July 17, 2011
Exotek F104 Link style front end-result
Wow, I was really happy with the this front end set up. Quite a bit had to do with the tires. I ran Pit R1-H 0572 rears and F1 0573 fronts. I had a bit of rear end hop, but I think going a step lighter on the side spring (from a CRC Red) would help that out. Otherwise, it was really good. It was easy to dial in caster and camber, and the setting held well. I started with 5* caster, but I reduced it to help get the car into the corner a bit better. Camber I set at 1.5*.
There will be a lot more testing, but I was very pleased for what was basically just a guess. Everything was really easy to work on.
There will be a lot more testing, but I was very pleased for what was basically just a guess. Everything was really easy to work on.
Exotek F104 Link style front end.
Here are a couple quick pictures of the link front end setup I made for my Exotek F104. This is the type of front end I'd like to run at the Vegas IIC race this fall. I'm not sure how everything will work yet, but it seems ok on the bench.


The red collars are Xpress RoadRunner parts. RC Mart should still have the plastic pieces available if the aluminum is not. The upper balls are from a 3Racing front end. Other than that, it's pretty simple.
Wednesday, July 13, 2011
IIC Vegas race to offer F1 class
Great News! The International Indoor Champs will offer F1 at the 2011 race.
From Scotty Ernst's Rctech post:
"The F-1 Class is definitely gaining support and it is official we WiLL be running a F-1 Class at the IIC.
I am still working out all the details and rules but it will be on Rubber Tires.
It will not be finished in time for the online Registration this Wed but you will be able to add that class when I have all the rules finished. "
"Hi Guys,
Great to read all the interest in the F-1 Class. Interest has been great since we thru the idea out. I was in Japan 2 weeks ago announcing a event and they had a F-1 Class, It flashed me back to my early days of racing in the TCS and how much fun I had with my Lotus and Sabre F-1 cars and it really got me fired up for the class at the IIC.
So it is Official! We will be running a F-1 Class at the IIC. I am working to set all the details and the rules, but it is going to happen. I will not have everything set in time for the online registration this Wed night, but you will be able to enter as soon as I have all things finalized.
Thanks to everyone for helping get the interest in the class for the IIC and keep spreading the word. Like Lightfoot said, it would be great to have a C main in this class.
Let me know if you guys have any other questions.. again, give me a chance to get all the rules and details set but it is going to rock.
F-1 at the IIC!
Game on.
Scotty"
Charles Lightfoot from the UF1 series helped to get the push started to have the class, and initial reports were that it would be based on UF1 rules for the "realistic" class - 180mm width, 21.5 motor/no boost, rubber tires.
I'll keep things updated as details come out.
Tuesday, June 28, 2011
F1 video from Strictly RC
You can now watch me continually blow the end of the short chute during practice, LOL. Thanks to Heinrich for posting this video. Note the yellow/orange/white F103 was the Pit Shimizu shod ride of Tom King, and the yellow car was the British Menace, Anthony Cotes (hope I spelled that right)
Pit Shimizu tires...on going info
So a couple weeks ago at the track here, Chauncey (known as cheROK 1212 on rctech..) ran the medium Pits on his F104 and was fast and happy with the tires (0573 and 0578??!?!). Then this weekend, Tom King (no relation) showed up with Pit mediums on his F103 (0543 and 0547??!!?). Once the tires broke in, his car was dialed as well. He said he bought the mediums based on Chauncey's experience. Our track is a parking lot sprayed with cheap rootbeer, so grip is usually at least medium/low or medium. I know this post from rctech.net detailed using a little harder rear to get the car steering more. Anyway, just thought I would share this with everyone. I really don't know too much more (I hope those part numbers are right), as I have been running Tamiya tires to work on my TCS setup, but both cars looked good and had happy drivers.
Thursday, June 23, 2011
What F104 should I buy?
Tamiya has a ton of variations on the F104 platform. This seems to confuse a lot of people, so I think a quick run down on what to use for what type of racing would be helpful.
First off, if you are running an "open" class, with no width or manufacturer restrictions, it would pay to look at a 3Racing F109, the F103 in it's various forms, or keep your eye out for a used Exotek chassis. These cars are usually faster than a narrow F104. They can also be cheaper depending on what model you buy. An F104W may also be a good choice, but the other cars are a little more sorted in wide form.
The HPI F10 can also be good for wide or narrow with an Exotek chassis. It may also take some more option parts to make it work in wide form from what I hear.
Carpet:
F104 Pro Black Special--Best deal hands down to run carpet on foam tires. Everything is in the kit. The regular Pro kit is ok, too, but you don't get the aluminum motor mount and aluminum pivot plate included.
Even on 3rd party rubber tires, the black car is the way to go. Pit Shimizu tires fit the stock foam rims.
If you're looking to go cheaper, or your racing rubber, the McLaren and Ferrari kits are not bad, but for foam you will need minimally a set of tires and wheels. The FRP chassis is stiff with the posts installed, and really the the only big disappointment is the friction shock. The TRF shock is probably the one must have thing. The motor mount is nice, but not something you HAVE to have, at least not right away.
With Tamiya you can be on the "option part installment plan", and add things as you go. This is not the cheap way, but it's cheap to start that way.
Obviously, no civilians have an F104X1, but it would probably not be bad on carpet for rubber tire with the long top deck. I guess we'll have to wait and see.
Asphalt:
If you can wait a bit for an F104X1, it looks to be the premiere model for rubber tire asphalt racing. I have not done a ton of foam tire racing on asphalt recently, but it would probably be great for that as well, possibly with some changes.
The Pro or Pro Black special models have all the extras, but are a bit backwards for rubber on asphalt. You will wind up changing a lot of parts to build traction into the car. At a minimum, you would want to buy a split upper deck or cut the stock one to put more flex into the car. The other thing is that really, the stock graphite chassis is far to stiff for rubber tire. Not bad if you plan to race foam in the winter as well, but not the best deal overall.
The basic kits are actually a pretty good deal here. Really, a set of Tamiya option soft rear tires (under $10) and the shock are what you need, if that. The friction shock might not even be that bad, but limited spring selection is not so nice. However, the steel axle is a plus, FRP upper and lower plates, and the bodies that come with these kits have a bit more rear downforce. Not a bad deal at all, and you can add parts as you see fit.
Sunday, June 19, 2011
Friday, June 17, 2011

Wednesday, June 15, 2011

Monday, June 13, 2011
Tamiya F104 Tire preparation
This past Sunday I was able to firm up some theories on what works with the Tamiya rubber tires for the 104. Lately, I have been getting the feeling that "oily" tire preparations of any sort make the car get greasy or loose feeling. That includes all of the Tire Tweak, SXT 2.0, Paragon, Jack, etc. After using Sticky Kicks Blanco, a treatment similar to Buggy Grip, but less aggressive, I felt that any oil type additive was leaving the tires somehow more slippery or greasy. The "softener" type additives penetrate the tire, but they flash off quickly the same way motor spray does.
Just to make sure I was getting a true result, I once again tried a oil type additive. The result was the same as what I have been getting all along, a sliding race car. Once I went back to the Sticky Kicks, that car was back to normal.
Speaking of Sticky Kicks, it produces a car that steers and has rear traction, but balances towards a bit of oversteer. I feel like this is a pretty good balance, since these cars are fastest when they have a lot of steering and you can be on power as much as possible. At the same time, there may be some track situations where it's more desirable to have a car with a balance toward understeer, or at least stability. At that point I would suggest just cleaning the tires with Simple Green. I tried this as well Sunday, and I was amazed at how much the characteristics of the car changed. It went from a bit on the edge of oversteering to locked down enough that I had to dial in dual rate to get the car through the corner. This is good however, if you're on a slippery track. Extra wheel throw is not efficient, but being able to jump on the power especially if the other cars are not as hooked up can be a big advantage. As the tires warmed up, the steering did get a little better. Simple Green is probably not a bad idea to start at a track with, and then move to other preparations as track conditions dictate.
Wednesday, June 8, 2011


Tuesday, June 7, 2011

Monday, June 6, 2011
TCS MEMPHIS race day
On race day, I got there pretty early. The track would probably keep changing, so I wanted to make at least a couple practice runs to see where the track was headed. The club decided not to re spray the VHT, so I assumed that the traction would continue to diminish. Fast lap on Saturday was at 19.1, and I don't think we came within half a second of that Sunday.
I switched to black front springs from gold after the first run I made, mostly because they calmed the front end down a bit, and actually added some turn in. That may sound contradictory, but I think the car was diving around, but didn't turn in positively. The car stayed flatter with black springs. In addition, I added a shim on the front axles, I think a .5mm. Again, this was just to stabilize the car a bit.
The goal on the day was really to just get the car dialed in with small changes. Saturday, I was able to get the major stuff out of the way, so here it was just small stuff. Mostly, this was front ride height, shims on the kingpin, and height on the rear shock, not necessarily in that order. After a few practices, I started to raise the front end up again. The car was not getting the forward traction it needed, and raking the car back just seems to get the forward bite back into it. I had taken all the posts out of the upper deck as well, so the car was able to flex a ton.
The front end actually wound up where it started, raised front ride height and an almost flat upper front arm. I had raised the arms at the kingpin by 1mm on Saturday, but by this time it was too much. After i brought the arm back down, the car still had plenty of steering, but I had more confidence to drive it in traffic.
The rear ball on the shock was actually key to how the car worked. I was amazed at how big of an effect that had on the traction of the car. I felt like soft rears and kit fronts with stock inserts were the tire to run, and there was a sharp difference between a raised shock and lowered shock. Really, that tire combo would have been hard to use without raising the shock up. .
Speaking of the tires, I ran the soft rear and kits in the first round, and I was able to qualify first. At the same time, I had to stay up on the wheel big time, as it was sensitive. For the second round, I switched to a set of kit fronts with a sedan insert in the front, but the car pushed at first and never picked up any steering. I had hoped it would balance the car out, and maybe even be better at the end of the race. I tend to think that to be fast the car just has to be a bit on the edge unless the bite is out of control.
For the main, the kit fronts with stock inserts went back on the car. I was starting second to Bruce "Doc" Hickman, who had been fast all weekend. The track continued to go away, so I figured I would just try to keep it close until the tires warmed up. Right behind us was Rocky, who was racing F1 for the first time, but he had shown to be a good driver who was still dialing in his "rent-a-ride".
When the tone went off, I was able to keep pace with Bruce. We were able to break away from the pack a bit, but both our cars seemed to be a bit slippery at first. As far as I could tell, he had a slight advantage in the infield, and my car got onto the straight and through the sweeper better. We went a round a few laps until we got into traffic, and bumped a bit, and I backed off so Bruce could maintain his position. As all this was happening, Rocky was able to gain ground and come back into touch with us. I tried to stay close in traffic, and at one point Bruce touched a corner while we were getting around another car. I was able to get into first at this point. As Rocky came up on Bruce, I was able build up a decent gap getting onto and off of the straight until I could relax a bit. At that point, it was going to be hard to make up enough ground in the time left to catch me, so I was able to take the win with a little gap.
I'll try to get the setup sheet tomorrow.
Saturday, June 4, 2011
Memphis pre TCS club race
Kind of a crazy day at the Saturday club race for the Memphis TCS. I got there pretty early in the morning, and ran a bit on the track, which had not really been prepared too much. After about 2 packs, they wound up spraying the track with VHT cut with methanol. Instantly, we had very high traction.
Immediately, the order of the day changed from finding stability to getting the car steering. I wound up doing some things I would not have predicted. I kept the 3.5mm offset steering blocks. I tried the stock block, but it didn't seem to help much on the tight parts of the track, which were many, and almost had less steering in other parts. This is very different from carpet, but perhaps it's a function of the rubber tires. I feel like the the steering block is a big adjustment, where you work other things around that decision. So I started to raise the upper arms at the steering knuckle. The car was very stuck so this actually was not as bad as I thought it might be.
I did also try more static camber, but it almost seemed to be riding on the edge of the tire. I don't know if that was more a function of the tire setup, but it was not turning in the way I wanted. Going back to 1.0 camber, the car turned in better. Angling the upper arm as I did got enough camber into the front end in roll, so keeping more tire on the ground was fine.
One more note on the front end, I did not have any grease on the kingpin to start the day, and one set of tires wound up really making the car hop. So I went right to 120K diff oil. Somehow, I didn't think it would make a huge difference, but in reality not only did it make a huge difference in the hopping, the car was MUCH more responsive. Sometimes, on carpet, I thought some over responsiveness was coming from the damper plate, but I now think that over dampening the kingpins is a lot of the reason for the twitchiness.
The upper deck was also part of the fun. I wasn't sure if the added traction of the VHT would make a big difference in what I needed to do as far as stiffening the chassis. Starting with only the pivot post connecting the upper deck, I made some changes, but that is where I ended. I tried 2 posts in both the forward and middle positions. Both provided a more locked in feeling, but they took away some steering, especially on turn in. The other part is that the more flexible chassis hooks the car up in general, especially in rear traction. As the day went on, traction seemed to fade a bit, so the most flexible option was still the best.
The rear shock height was also way more sensitive than I expected. For much of the day, I wasn't quite sure what to do to get the car to keep turning off the corner. I tried a stiffer spring, which was ok, but not quite what I was looking for. I took only 1mm off of the rear ballstud for the shock, leveling it a bit. This made the car very responsive, and almost loose! The next run I added the spacer back, along with an additional 0.5mm and this went right back toward a push on power. This actually made it possible to use different sets of tires based on how much rear bite the car had on power. I did not change the front ballstud at all, and I am curious if it is as sensitive as the rear ball stud is.
The little 1800 pack also came out for this race, with as much traction as there was. I ran it until about mid afternoon, when traction seemed to fade a bit. The 1800 is perfect when traction is high, since it is obviously faster even to the naked eye. I had a guy ask me if I had a brushless motor in the car, lol. However, as the day wore on, I went to an Orion 3200 to provide some more mass, and that turned out to be the best choice in the later afternoon. The track had quite a few 180s and slow sections, so the stability and forward traction were much more valuable than overall speed.
For tires, I started with a set of Option soft rears and kit fronts, with stock inserts. The tires actually were great. Later I tried the same type of tires with a 26mm sedan insert, and the car actually locked down quite a bit, and started to push. I was surprised, but even with the high air temps (99* F) softer inserts were better. Later, on advisement from my buddy Jay, I tried a set of tire with no insert at all. This can actually be a good option when the temperature is high since the tire cools better. I did notice that I ran better in the last half of the race. At the same time, as the day wore on and traction faded a bit, these tires pushed just a bit. The stock inserts were just a bit better, especially on steering. The thing you had to be careful of with the stock insert was roasting the tires at the end of the race.
The car was definitely really good, so tomorrow should be very exciting...........
Friday, June 3, 2011
Thursday, May 26, 2011

Wednesday, May 25, 2011
Tuesday, May 24, 2011
Rambling about rubber...
This year so far, the tracks around here have been pretty green. They have been preparing them, but there still a lot of grit and sand and junk out there, so it's been lower traction. Most of my tuning has been to try to get the car to have grip enough to leave the corner better, and still steer.
I have been running the split upper deck sans damper plate, he car doesn't seem to miss the plate so far. There really hasn't been enough traction to make the car roll hard just from the grip. However, and this plays into the heavy pivot post's usefulness, as the car gets heavier, it may be worth while to try it. The heavy pivot post is a nice part, especially for rubber tire since you save room on the chassis. I have been adding an additional 1 oz. (28g) lead per side right behind the radio trays, so 2 oz. or 56g basically in the center of the car. This is VERY helpful. in addition to that, I tried another 14g on each radio tray as a test, which i'm undecided about. I also run 14g behind the servo flat on the chassis, and 7 to 14g on the wing right about even with the body mount for the nose. This weekend I also added 14g (7 on each side) to the wing right in front of the camber plate.
The nose weight depends on the track, and how much grip the car has. Too much (usually more than 14g in the forward most position) and the car won't center up. Too little and the car will push especially on power.
My car wound up as a tank with about 140g of lead spread around the chassis overall, not counting the additional weight of the heavy post over a plastic or aluminum piece. The only bad thing was as I added the last 28g to the car on the radio trays, it started to roll more and even wag the rear end a bit until the tires warmed up. At this point I'm not sure if I just have too much weight, or if I need the damper plate back. I tend to think maybe just a bit too much weight. I probably will try the damper plate just because it's worth knowing the effects.
I have found you can still use the camber settings (1.0, 1.5, 2.0, etc) to add overall steering without making the car totally bananas, if you reduce camber gain with a lowered, flat upper arm. I was able to go from 1.0 to 1.5 to get some more steering without overpowering the rear of the car. I'd like to add even more just to see what will happen. I know last year, adding camber always helped steering. When the traction was really good, you could run 2* + and really get the car turning.
The other really important adjustment for rubber tires is shimming under the rear ball stud of the upper arm. This controls the active caster effect, and is super critical for rubber tires since this car always wants to wash out the front end mid corner. Adding shims under the ball stud will add mid corner grip. I got up to 1.5mm in shims this weekend, had the extra steering, but it was still controllable. This is probably the most important adjustment for rubber tires, since it works very independently of the other front end changes. You can maintain the fell you have and still add or reduce cornering power.
I recommend the split upper deck as well. Right now I have it on, and I only have the screws in the pivot post securing the upper deck. I'm using the FRP lower chassis, and I think letting the chassis flex front to back is letting my car get more forward bite. It was able to launch pretty well out of the corner. Usually, I would not think the front to back flex would help, but I think the funky T bar design needs all the help it can get putting the power down.
Sunday, May 15, 2011
Rain
It was 90* and sunny about 5 days ago...It's 45* and has been raining for 2 days, just in time for the weekend. I'm going nuts over here..........
Friday, May 13, 2011
The Wide front end project
F1 is getting popular outside of Tamiya series racing, and that means the opportunity to be a bit more creative with option parts and cars. The local series will be running F1, and 200mm wide cars will be legal (F103, F109, F104W, etc.). Usually this means you stick a standard F103 or a 3Racing front end on your car with some F103 foams and you are ready to rock. While the F103 front end is rock solid, it's also not adjustable. The 3 Racing setup is not bad, but the plastic is only ok, and it's kinda sloppy.
So this is my amalgamation of parts to make a caster/camber adjustable front end that at least sort of looks like it might belong on a modern car. It's not a final design, but maybe it will inspire some of you guys to try some new stuff.

I cut an old upper arm from a 104 down, and drilled and tapped it so a short turnbuckle could run from the arm to a 104 camber plate mounted on a Tamiya F103 Link type lower arm. You can substitute a 3Racing lower arm as well. Another turnbuckle runs from the chassis where the rear ball mount goes to the top of the upper arm. I had to remove almost all of the rear strut of the upper arm. The turnbuckle is mounted to the arm with a Losi open ballcup fitted with a "top hat" sleeve from a sedan caster block. This is to let the rear turnbuckle only have circular movement vs. a typical ball end. I though everything would be too floppy with a regular ball stud on there, but I may try it out later. The upper arm was drilled and tapped to mount the turnbuckle
 So now the camber and caster can be adjusted infinitely, as well as the camber gain at the inner link. The setup is a bit more complicated, as both links work together, so changing camber will change caster a bit and vice versa. It's just something you have to be aware of.

I did want to incorporate more of the upper arm's rear strut, but I didn't have another short turnbuckle around to make that work. There would be no advantage except that it would look a bit more scale.

One other idea would be to make a similar front end, but with both links coming off of the camber plate. This wouldn't look as close to the modern cars, but it might have a bit more adjustment capability in terms of ball stud heights
So this is my amalgamation of parts to make a caster/camber adjustable front end that at least sort of looks like it might belong on a modern car. It's not a final design, but maybe it will inspire some of you guys to try some new stuff.
I cut an old upper arm from a 104 down, and drilled and tapped it so a short turnbuckle could run from the arm to a 104 camber plate mounted on a Tamiya F103 Link type lower arm. You can substitute a 3Racing lower arm as well. Another turnbuckle runs from the chassis where the rear ball mount goes to the top of the upper arm. I had to remove almost all of the rear strut of the upper arm. The turnbuckle is mounted to the arm with a Losi open ballcup fitted with a "top hat" sleeve from a sedan caster block. This is to let the rear turnbuckle only have circular movement vs. a typical ball end. I though everything would be too floppy with a regular ball stud on there, but I may try it out later. The upper arm was drilled and tapped to mount the turnbuckle
I did want to incorporate more of the upper arm's rear strut, but I didn't have another short turnbuckle around to make that work. There would be no advantage except that it would look a bit more scale.
One other idea would be to make a similar front end, but with both links coming off of the camber plate. This wouldn't look as close to the modern cars, but it might have a bit more adjustment capability in terms of ball stud heights
Subscribe to:
Posts (Atom)