Thursday, October 17, 2013

Exotek 2013??

During my usual snooping about the intarwebs, I noticed a photo from the recent RCF1GP race in California at TQ Raceway.  It appears that Exotek may have something new for the Tamiya F104V2

Looks like a new upper plate for the motor pod, as well as a new cross brace for the side springs and damper.  Interesting.....

What's this?  Is that a damper from the shock mount to the servo, or a brace?  What about the front end, those look like damper tubes there....Hmmmmmm


Tuesday, October 8, 2013

Tuning Haus Accessories Line

Tuning Haus, a new brand under long time racer/rc industry big wig Bill Jeric has introduced a bunch of F1 related parts for the F104 and VBC cars.  They also have quite a few more universal products like spacers, shims, fluids and tools.  Check it out!!

Sunday, September 29, 2013

FGX belt conversion by TQ Raceway

http://www.tqrcracing.com/forum/view.asp?doc_no=21&bbs_no=8

TQ shows you how to convert to belt drive with 3Racing parts!!!


Friday, August 23, 2013

TCS Finals

Jusr finished Friday practice for TCS finals...F1 looks super competitive with a ton of fast cars on the track.   Several times a big freight train formed on the track during practice.  I have no idea what is going to happen in qualifying.

Thursday, August 15, 2013

Tamiya Championship Series North American Finals

I'm leaving for the TCS NAF tomorrow....We'll see how it goes.  I might be able to do some posts during the week.

Wednesday, August 7, 2013

Tech racing...the newest in new???

Interesting stuff from Tech racing...Note this first photo:

"○ can be attached to the F104 series Tamiya, 2.5mm carbon suspension arms.
○ camber angle, can be selected for the 2.5 degrees and 1.5 degrees left and right change the mount.
○ caster angle also can be selected 7 degrees and 5 degrees at a fixed position of the upper arm mount.
○ King pin ball of the upper arm in the mobile, and smooth movement.
○ Upper arm block, can also be used for movable suspension arms Tamiya genuine.
<Set contents>
· 2.5mm carbon upper arm
-Such as King Pinball mount upper arm mount and other mounting screws

Release Part Number mid-June:: FCP010 Release Date
Fixed price: ¥ 3,200 "


Similar to something that has just come out, but this was first.

Now check out the second picture. Perhaps we'll see this from a big name soon...


UF1 MIDWEST Round 1 photos

I just came across the photos from round 1 of the UF1 Midwest series...Enjoy (photos by Nathan Thompson)


Monday, July 29, 2013

SP-1 diff item

One quick addition to the Sped Passion SP-1, regarding the diff.  The washer between the conical pressure washers and the diff nut should be replaced with a Tamiya RC Diff Spacer: 58431.  It makes the pressure on the conical washers even and improves the diff action....

Sunday, July 21, 2013

Speed Passion SP-1 ..Caster is faster


I ran the SP-1 again today to try to get a comparison with my other cars, and it was again very close to my other car.  In fact, the qualifier I used it for was virtually identical to my best time with the other car.  To be honest, I didn't even think it had as much motor as the other car but it had a ton of corner speed. 

So, I was thinking about this and it occurred to me that at 10* of caster, the SP-1 probably has one of the highest caster settings of any car out there out of the box.  My local track is a really large track originally built for gas cars, so it's very high speed.  I can really stay on power with the SpeedPassion car. I had to assume that this was one of the major factors, so I added more caster to my other car and that car picked up the pace as well.  Interesting.

Tuesday, July 16, 2013

SpeedPassion SP-1 setup

SpeedPassion SP-1 asphalt setup

Most of what I did to the car was to try to get maximum traction on both ends of the car.  The link toe in was something that I wanted to try and it seemed to be pretty good for the car.  When the traction was up on the track in the main I was able to drive most of the track on power. 

I also added to the steering rack spacers for a total of 3mm to add some angle to the steering rods.  This made the steering a little more aggressive, but the car was making enough traction to handle it.  I did also mount the shock as far forward as possible, which added to the steering.  That may need to be backed off for lower traction tracks, so it might be a good idea to start in the middle hole depending on your track.

Rear droop was pretty minimal, about 1.5mm.  This usually helps keep the car a little more stable off power.

I did also try CRC White side springs and about 2* camber, which was very good when traction was up, but as traction went down after the mains, this was a bit too much. 

Overall, I was very happy with the car right off of the bench.  While I was testing some changes out on my usual car, and the track changes during the day,  ultimately the SP car was .2 second per lap faster on this day.  That is a pretty good result.  If nothing else, the car is at least as fast what I have been running.

SpeedPassion SP-1

I am now in the possession of the new SpeedPassion car, the SP-1.  Like most of the new cars out there it is  a link style car.  The front end is a little different than most, using an upper pivot ball similar to a 1/12 car like the CRC line. It also utilizes a steering rack as well, instead of the traditional direct steering set up.
The build up is a little different than most to get an 190mm legal car with Pit Shimizu tires, so we'll dive in with some photos.

I decided to add another hole for the links in between the two available.  I have noticed some of the cars out there have some angle to the links.  I had Howard Lo of Speed Passion do this to his car and I wanted to be able to try different settings as well.  I drove Howard's car before I built this and I felt like it had a lot of rear grip compared to the typical straight link.  The photo shows a line scribed in the CF with the point of my calipers.  I used the calipers to find the difference of the holes on center, and then I scribed the line by centering the point of the calipers on the edge of the existing holes. I did the same with the pod plate.


Once drilled I finished the holes with a dremel stone bit that happens to be just about perfect as a countersink.

Now I can select multiple angles for the links to get the amount of "link toe" that I want.  The link toe seems to help the car be more planted. UF1 MIDWEST inaugural champion Rick Vessel says this is due to controlling the roll steer inherent in link cars.  Remember that changing the link positions will probably require resetting the "football" pivot.

Note difference in angle in the links !!  Also Tamiya F104V2/RM01 links fit perfectly if you need them in a pinch, or if you want to try their hard carbon version.

While we're at it, you may also want to address the 3mm nuts used on the football pivot.  I am a Dremelin' fool, so I knocked the flanges off 2 serrated 3mm nuts and used those to secure the pivot without rounding out the plastic on the pivot.  Another suggestion is to use a 3mm tap on the nyloc nuts that come with the car so they will hold your setting but not round out the pivot when you need to make adjustments.

Another nice adjustment is the ability to move the shock forward and back on the top deck.  There are 3 holes, though one seems to be designated for the antenna tube.  I don't use an antenna tube, so it's open for shock attachment.  Moving the shock forward will put more weight on the nose end of the car for more steering.  I did have to use a Tamiya long shock end to reach the longest setting however


As far as the front end, you should look at Howard Lo's RCTECH post on the 190mm front end modification.  It has all the changes you need to make to get the front end where it should be on Pit tires. Be aware that the screws should be through the INSIDE holes on the graphite plate, and the OUTSIDE holes on the aluminum cams on the arms!

There are a couple other things as well:
I drilled out the front half of the tension adjustment hole for the lower suspension ball.  This allows a little finer adjustment on the tension by having one side of the arm free. The lower suspension ball is plastic and it is my one gripe with the car.  I had to do some hand finishing and sanding to get the ball free in the arm, and I still was not really pleased with the result.  A little teflon powder helped to free it up but the ball either needs to be metal or the plastic needs to be improved.  An aluminum ball would be perfect here.


.Here you can see I dremeled a slot in the ball retainer to make it easier to thread in and adjust with a flat blade screwdriver.

In lieu of using shims under the steering knuckle, I used a 3mm screw as a droop screw for on the fly adjustment at the track.  Note that you should set the length of the lower kingpins the same on both sides before setting the droop screws.  The easiest way to do this is with a caliper measuring the length of the kingpin past the lower ball.  Mine is at 5.5mm between ball and the lip of the kingpin.

That's most of the car.  I'll elaborate on inital setup in my next post on performance.  Please do note that the spur gear that comes with the car is actually really important.  It has 18 balls, and I think helps contribute to a very smooth but slip free diff.  The extra balls help with a good lock up without too much tension, which is huge on rubber tires.....


Monday, July 1, 2013

Fred Medel of Tamiya USA on the TRF101

Fred posted on Rctech on the new TRF101 and what it does differently on the track:

"Hello All,

I decided to take the TRF101 for a spin. I built one off the shelf to see how I can best share the differences between both platforms.

As most of you may know I have A LOT of time on the V2. About 6 weeks ago I was in Japan talking to the designer of the car. In case anyone wondered it's Kiyo Suzuki. He's the same fellow that travels the world with Marc Rheinard developing the TRF touring cars. The man knows his stuff when designing cars in case you wondered.

In short Kiyo and Satoshi Maezumi told me the new front end changes the way the front end responds to your steering input. Basically, you'll notice it feels more neutral compared to the standard front end. Having driven a million laps with my V2 around the Tamiya track I can confirm that is indeed the case. The V2 is a stable car. However, the 180 hairpin turn after the sweeper has always frustrated me as the V2 wants to continue to turn. You have to be careful after the 180 to keep the car straight to make the inner sweeper. In the past I've tried to fix this with dual rate on the radio and with tire choice and sauce application tricks. With the TRF101 the car enters the turn with immense stability and there is no sign of the car wanting to continue to turn after applying throttle after the 180. It's just that stable. I believe this is the case because you now have a solid front end like the F103 on top of having the side links further apart. With the F104 link front end you have more movement going on with the front end, which makes for some unwanted movement. I didn't think this was an issue before, but it seems like the solid front end cures sensitivity and over-steering. Also, loosening the front screws on the carbon mellows the car out even more. If you think the front carbon piece doesn't move if you loosen it think again. There's a ton of movement. It's a great tuning option. I would suggest making sure the whole is big enough so the screw moves freely with the carbon top piece. Also, Kiyo informed me that I should experiment with using O-rings instead of the steel washers in the middle of the front end. This will make for a softer and dampened front end.

In short...I put two packs throw the car with my V2 starting point set up. It can only get better once I begin to play with more things. For one, the stock instructions have the TRF shock built with too much droop. Surprisingly, the car remained stable at the Tamiya "Kink" even with that much pod droop. Typically, you have to set the V2 with little pod droop to keep the car stable though the kink. Not so with the 101 so it seems, but more testing is needed.

Anyway, I hope everyone is enjoying their new toy. I am. I'll post some pics soon to show how easy it was to get to 4.2mm ride height on the front without having to use shims on the upper arm. At the Tamiya Track lowering the car below 4.2 is not recommended.

Stay tuned..."

Friday, June 21, 2013

TRF101-may not be TCS legal for 2013

"Because the TRF101 is so new and has an unknown differential in performance to the F104, its legality in the TCS series is on hold for the remaining 2013 regional events including the Finals and will be reviewed for 2014 season. We will have a better understanding of how the chassis performs in relation to the F104 line and can proceed appropriately."

David Jun of Tamiya USA

http://www.rctech.net/forum/12277937-post18060.html

Buyer beware!! It appears that you may want to hold off the TRF101 if you are planning on using it for Tamiya TCS events in the USA.

Wednesday, June 19, 2013

Yeah Racing Transformula TransThingula

So I saw a Yeah Racing Transformula kit on ebay with no reserve. The car was kind of intriguing in that it was a bit of a precursor to all the link cars out there and one of the first aftermarket set ups since the resurgence of F1 racing. I also saw some things I liked about the kit that I though I could use. Anyway, I got the kit for about $85, which was good as the other ones I saw on ebay are going for about $160.

The car showed up and it was actually completely built.


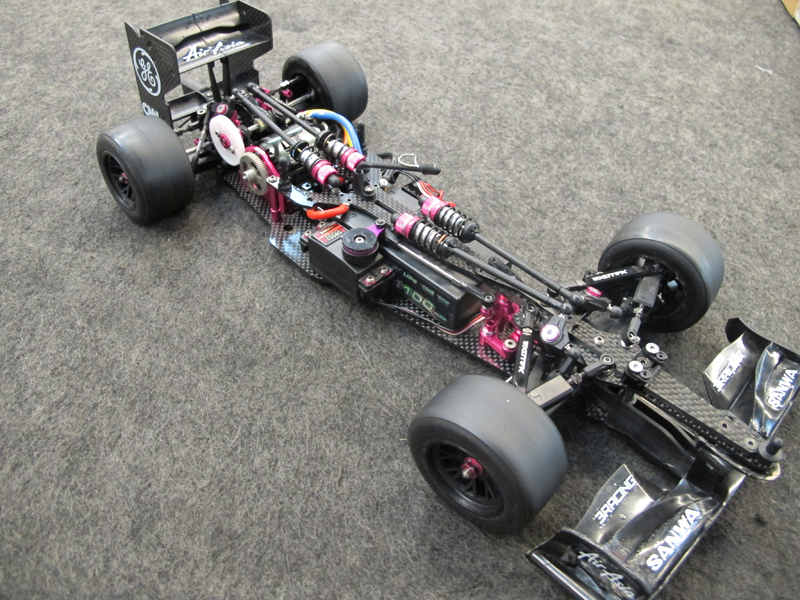
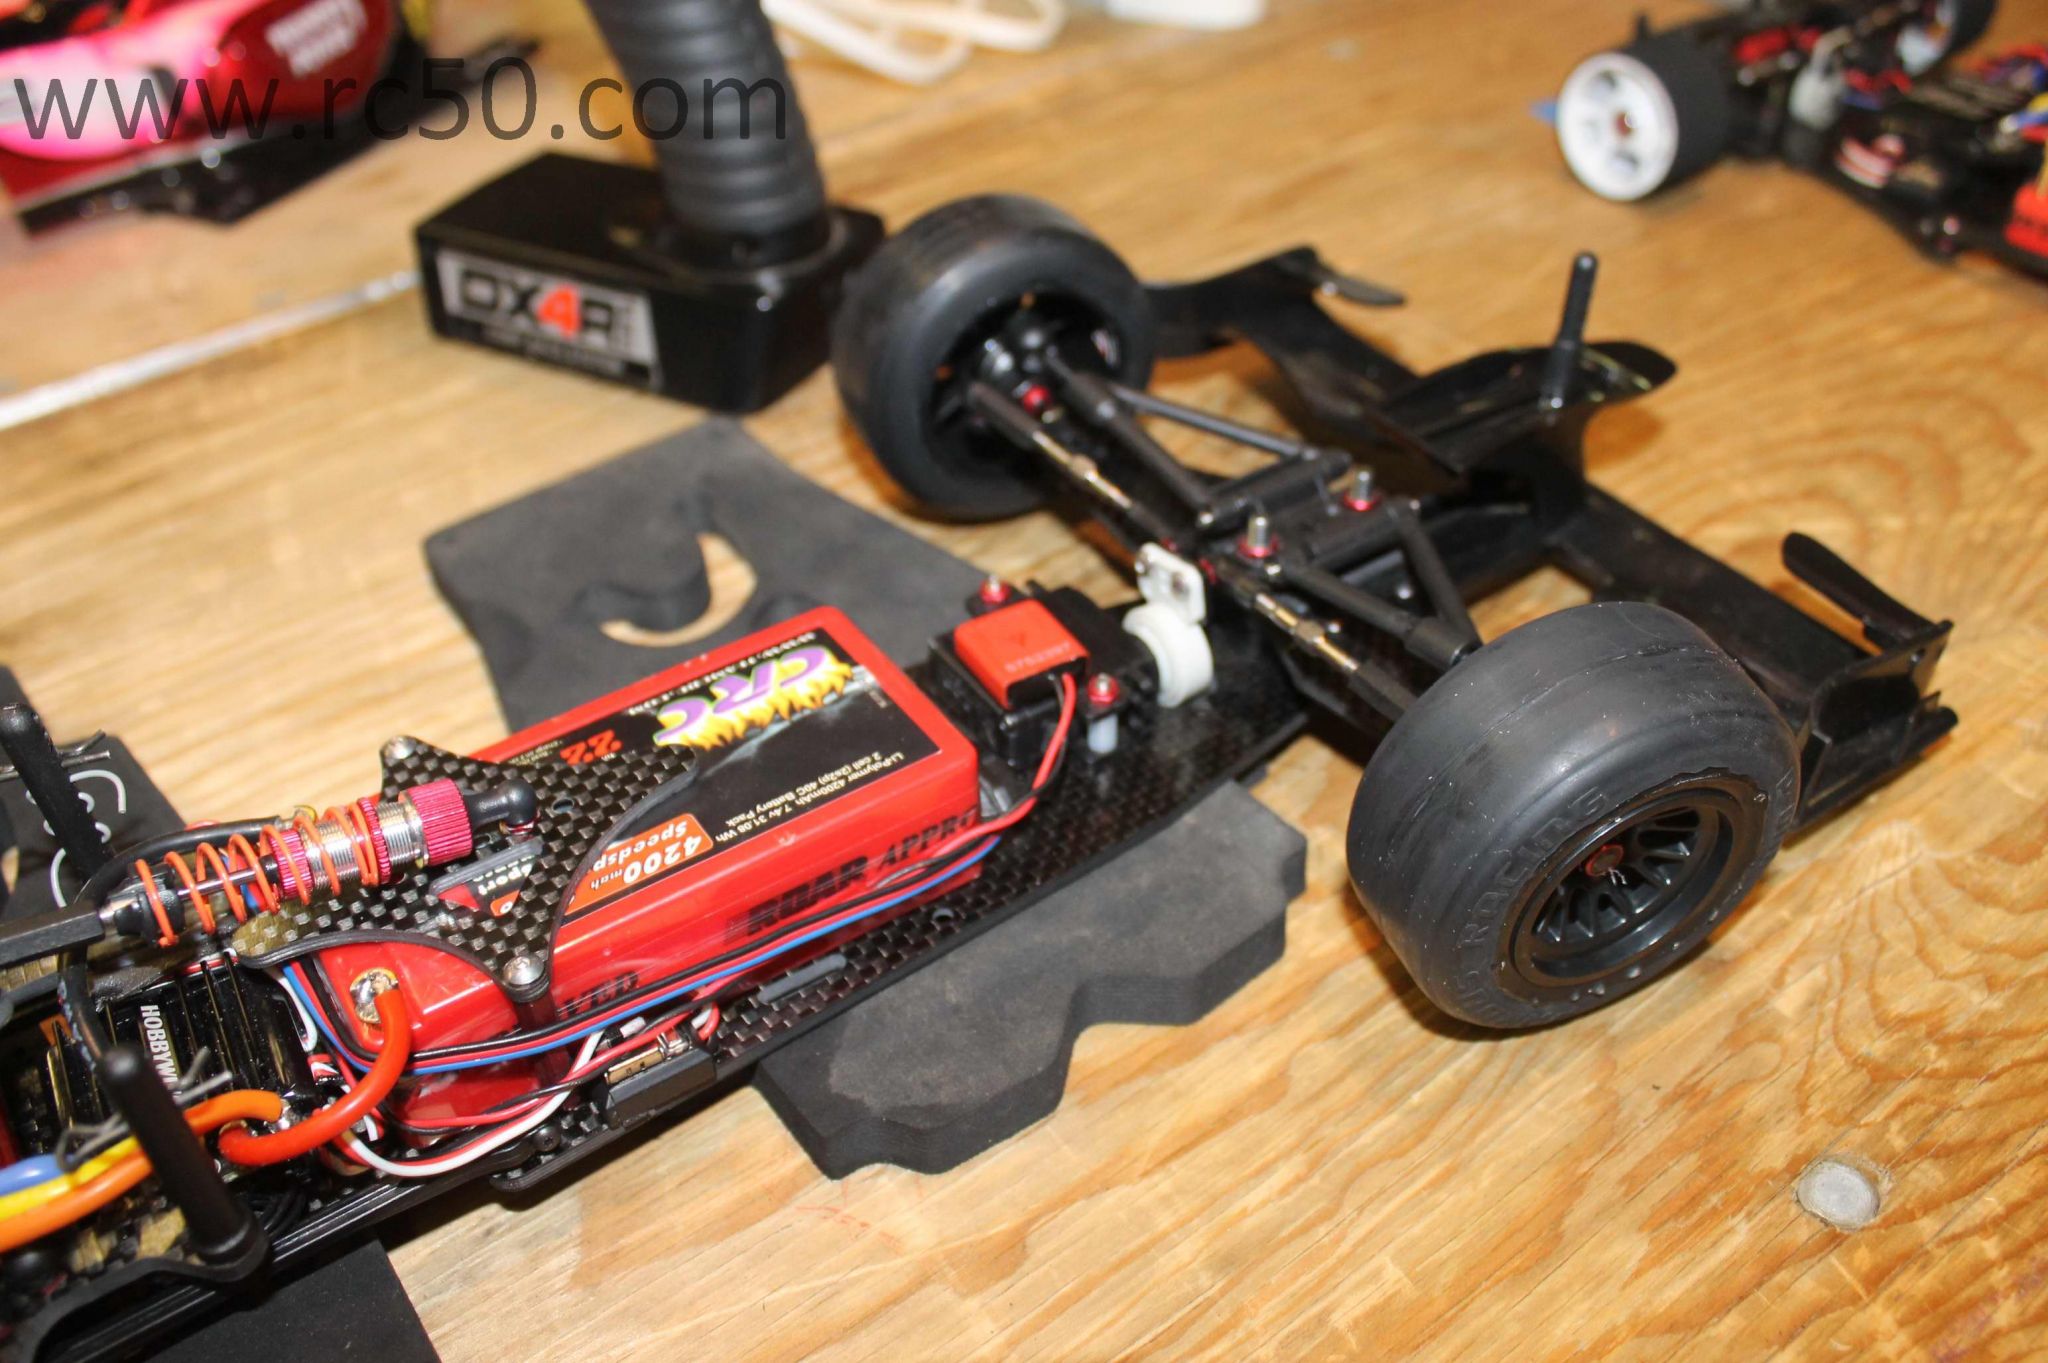
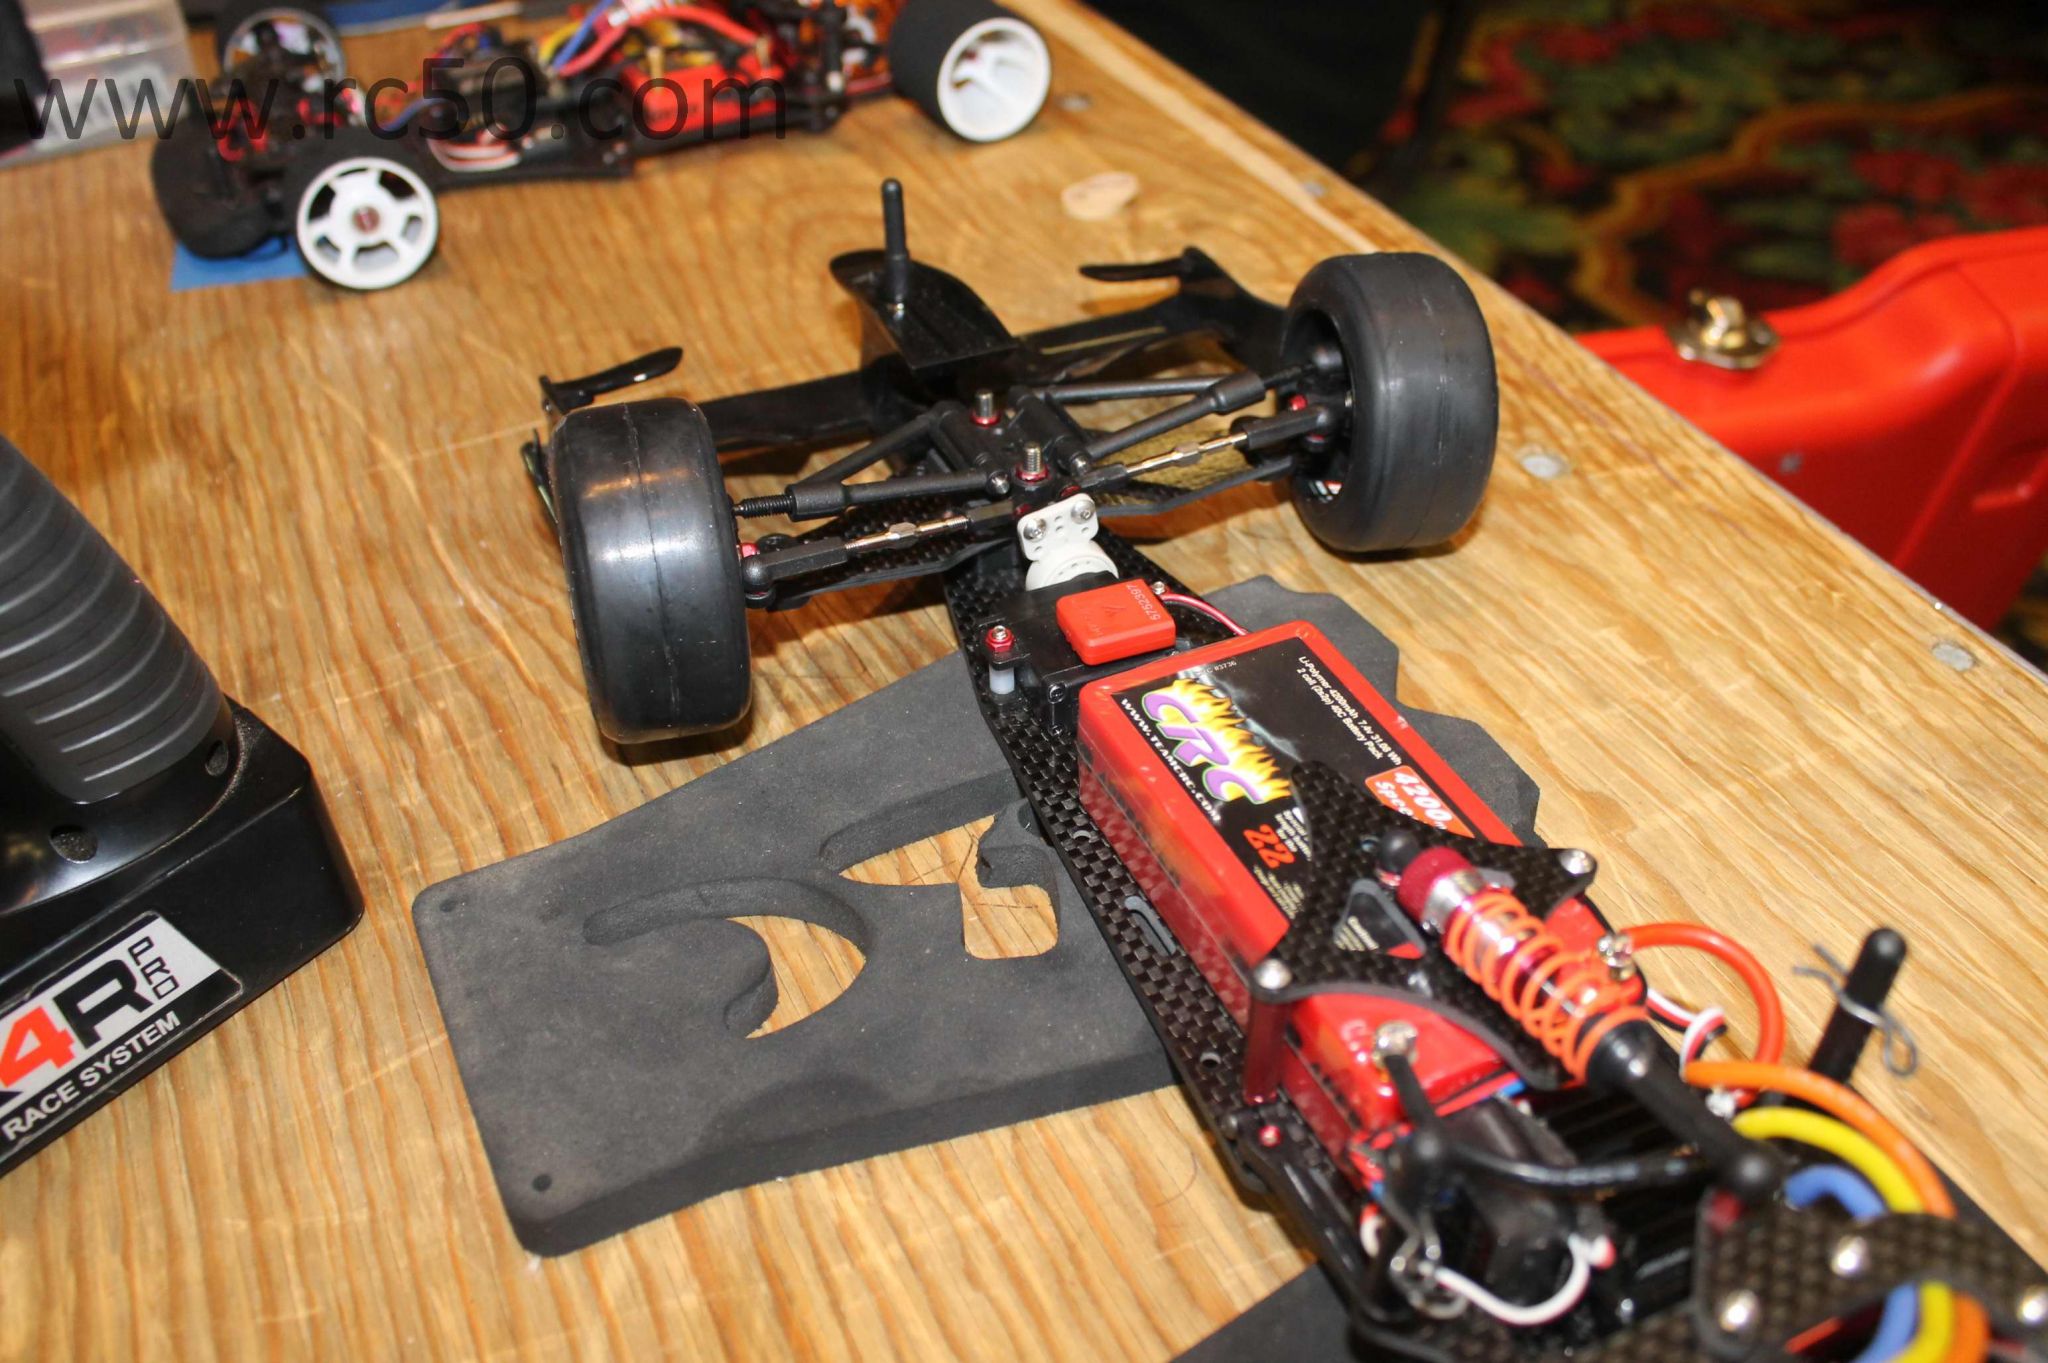
The thing about the chassis is that it is F103 length. That is quite a bit shorter than an F104, and makes the car do strange stuff if you attempt to run it to the narrower F104 width (180-190mm). Unfortunately, this rules out using the link setup. However, the T bar setup, which the car comes built with, is able to be modified to a wheelbase closer to the F104. Moving the support posts for the upper deck and t bar connections to the extreme rear of the chassis plate will give a wheelbase about 4mm shorter than an F104, which is acceptable.


I used the upper deck as a template to re drill the holes in the chassis plate. Luckily, everything lined up almost perfectly without interfering with any holes already in the chassis. I also had to drill new holes to move the body mounts to the correct position for a modern body.


After setting up the rear end of the car to length, I wanted to put on the F104 front end with Exotek parts. I didn't really anticipate there being any problems with this, but the Yeah racing servo mounts are meant for an F103 front end. Normally this just means the mounts have to be replaced with F104 style servo mounts to work with the F104 front end parts. What's weird is that the Yeah racing parts are about 2mm shorter, requiring the chassis to be re drilled again to work with standard F104 parts. It's really weird since the F103 and F104 parts from Tamiya are totally interchangeable....


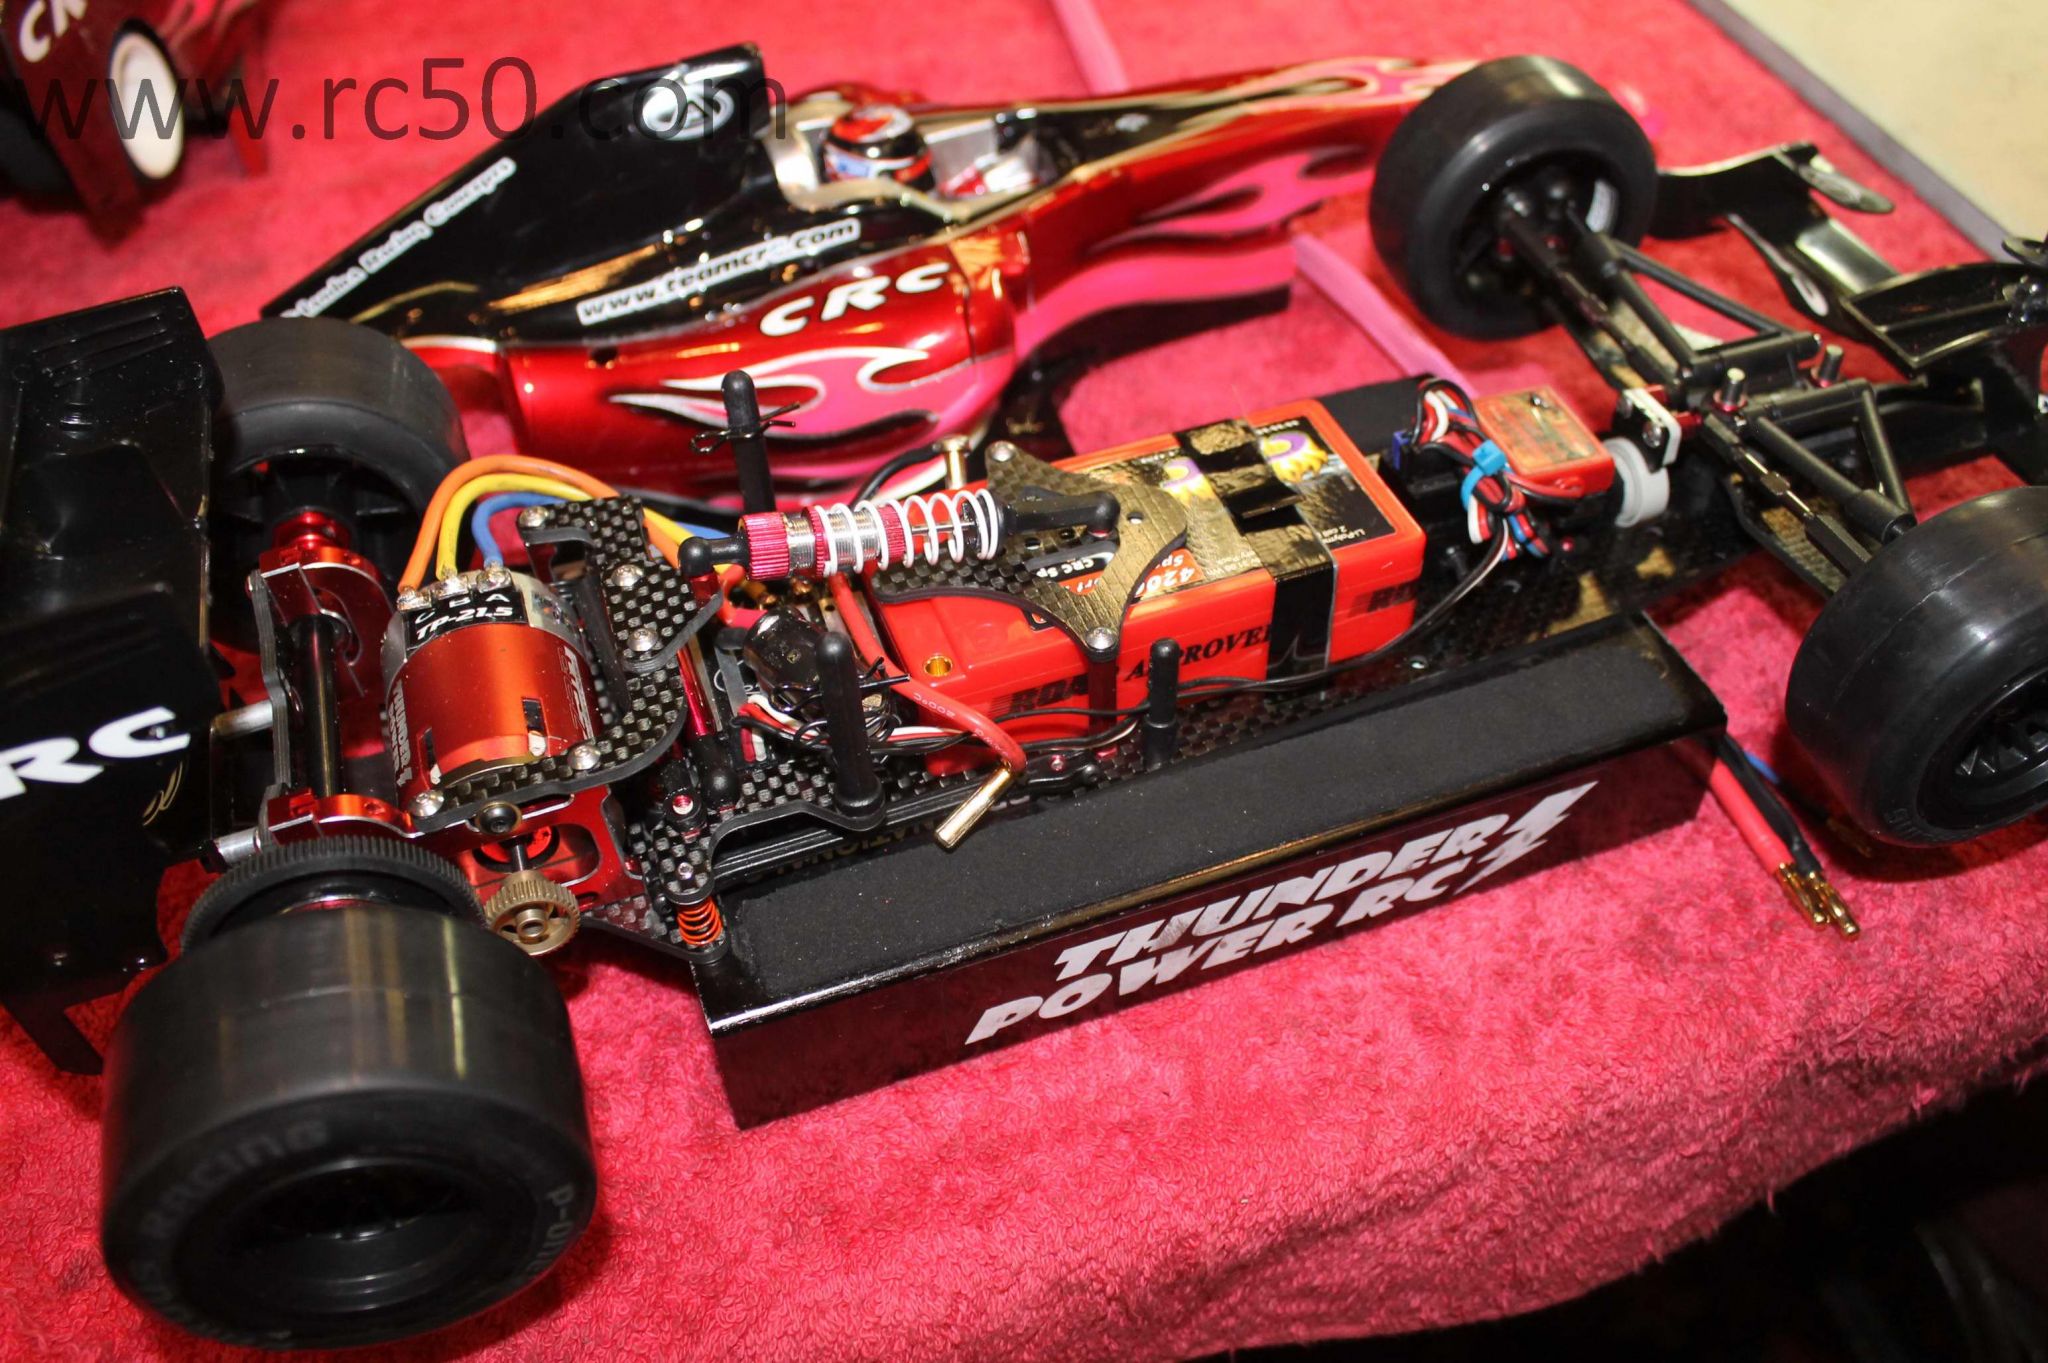
Once I was done drilling, here is the closer to finished product:


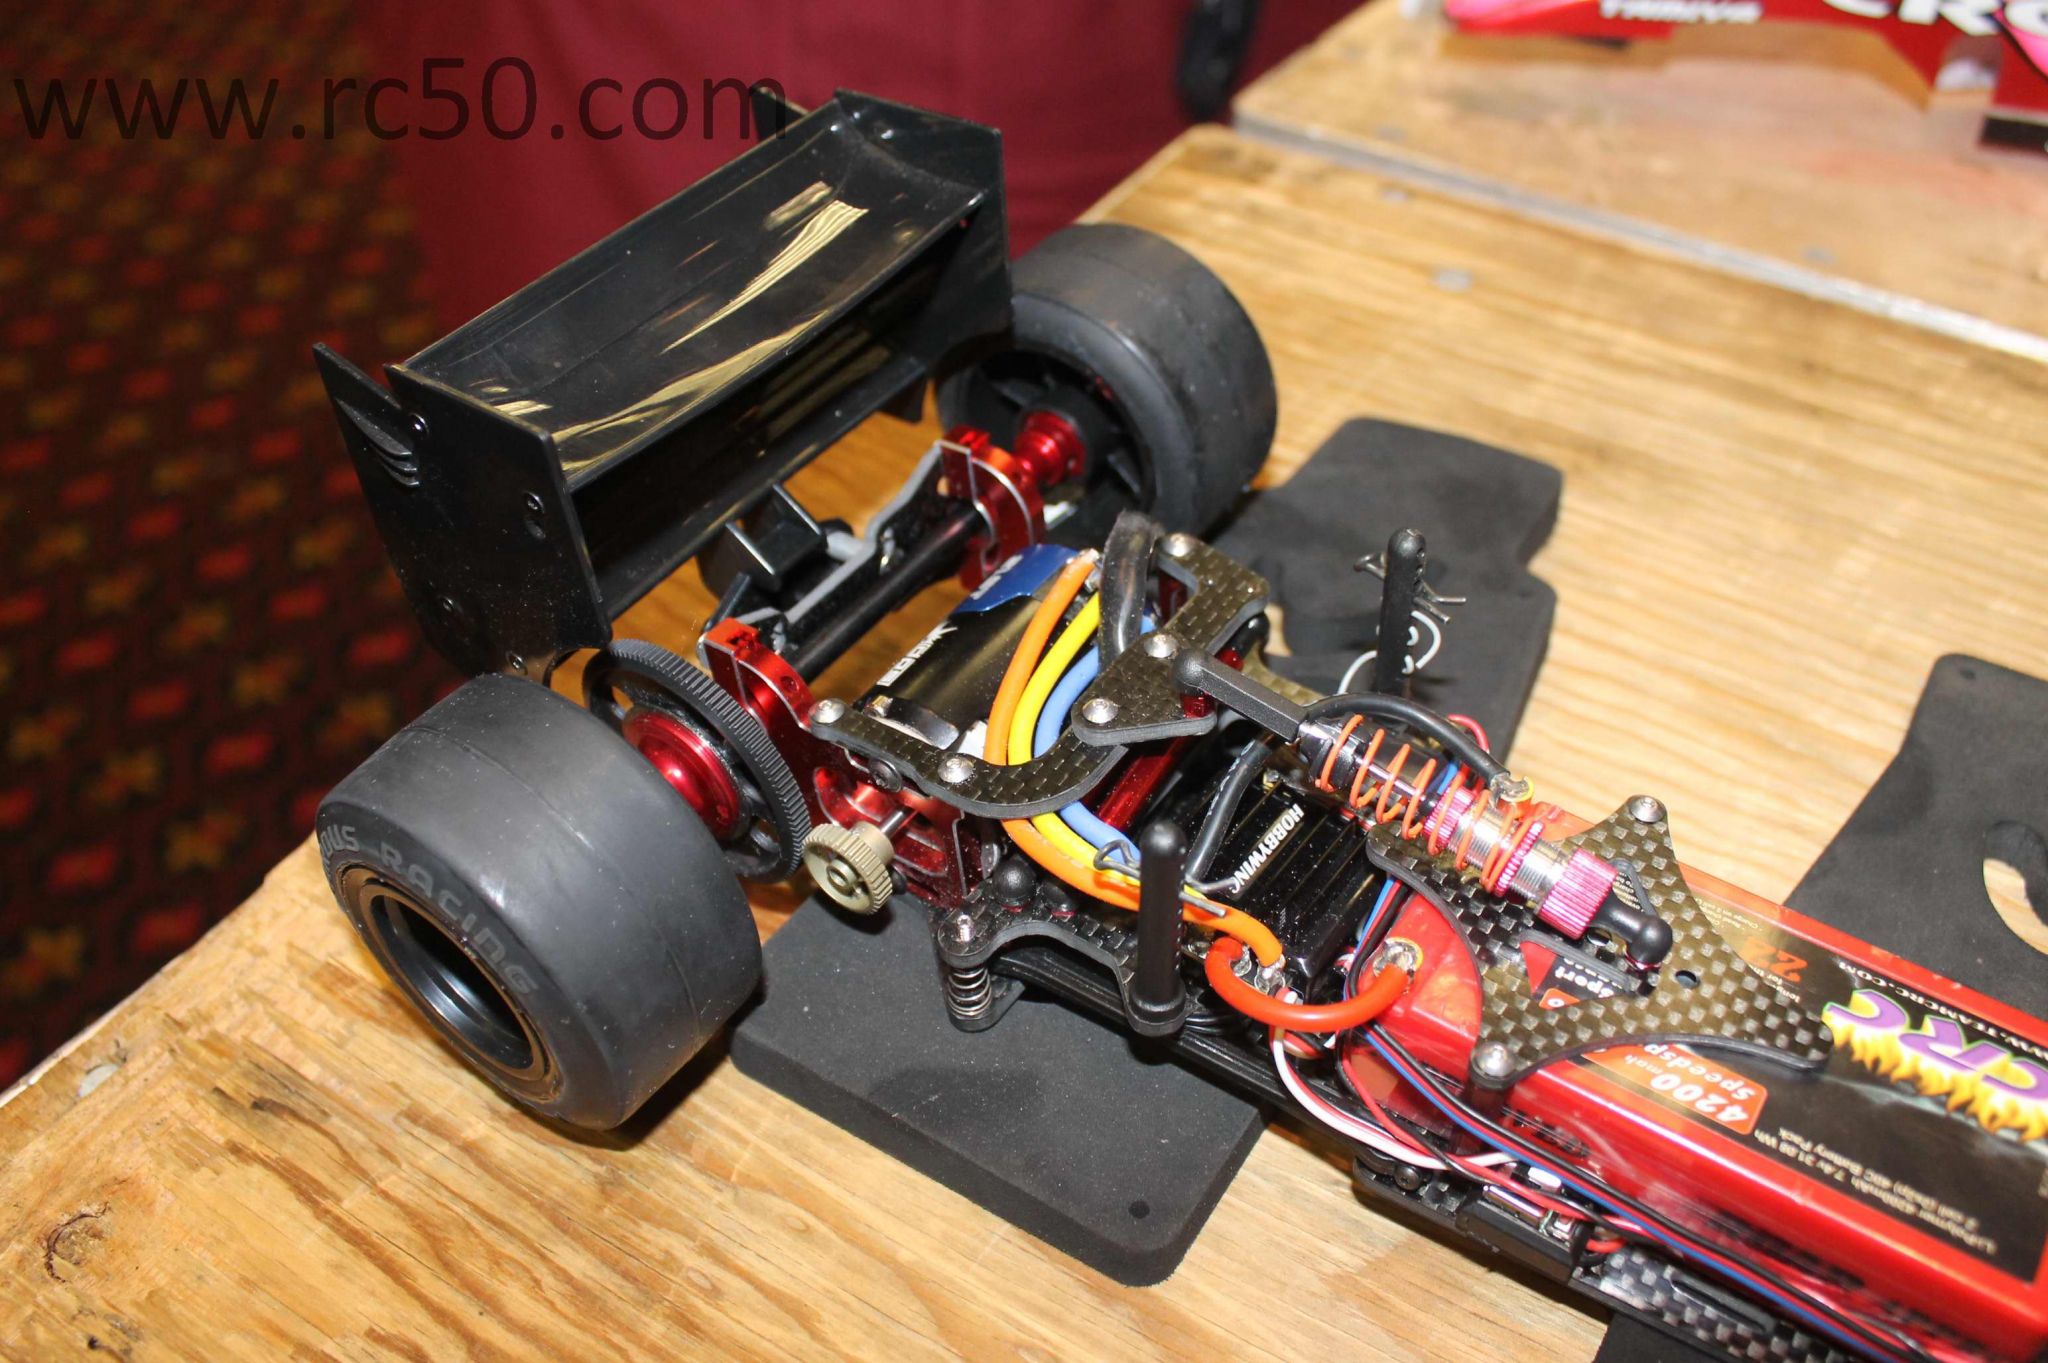
I did want to show the dual damper setup I was able to build. The motor pod parts support this for the link setup, but I was able to adapt it for the t bar configuration using the old body mount holes, and the plastic tubes from the F104V2 parts tree. I used the plastic damper tubes since I needed to cut them to fit, and I would not be making a mistake on the more expensive option roll damper tubes. Eventually I will replace the plastic tubes as the idea has proven itself on the track. The only reason I would replace the plastic tubes is that there will be more surface area on the option damper tubes once they are cut down.


Another small problem is the motor pod. It is like the F103 pod, set up for the smaller F103 tire. Ride height becomes excessive when F104 diameter tires are used. This was not a big deal as I was able to take a used F103 t bar and cut it down so only the pod area remained to make a spacer. This brought the ride height to about 4mm with the #2 axle cam.


To work with the modern bodies, a shorty pack fits perfectly. To secure the pack, I put two holes in the upper deck slightly wider than the pack to retain the battery. Tape is very hard to work with in this case, but the screws keep the pack from moving. The fit is pretty snug otherwise, so only the screws are really needed.


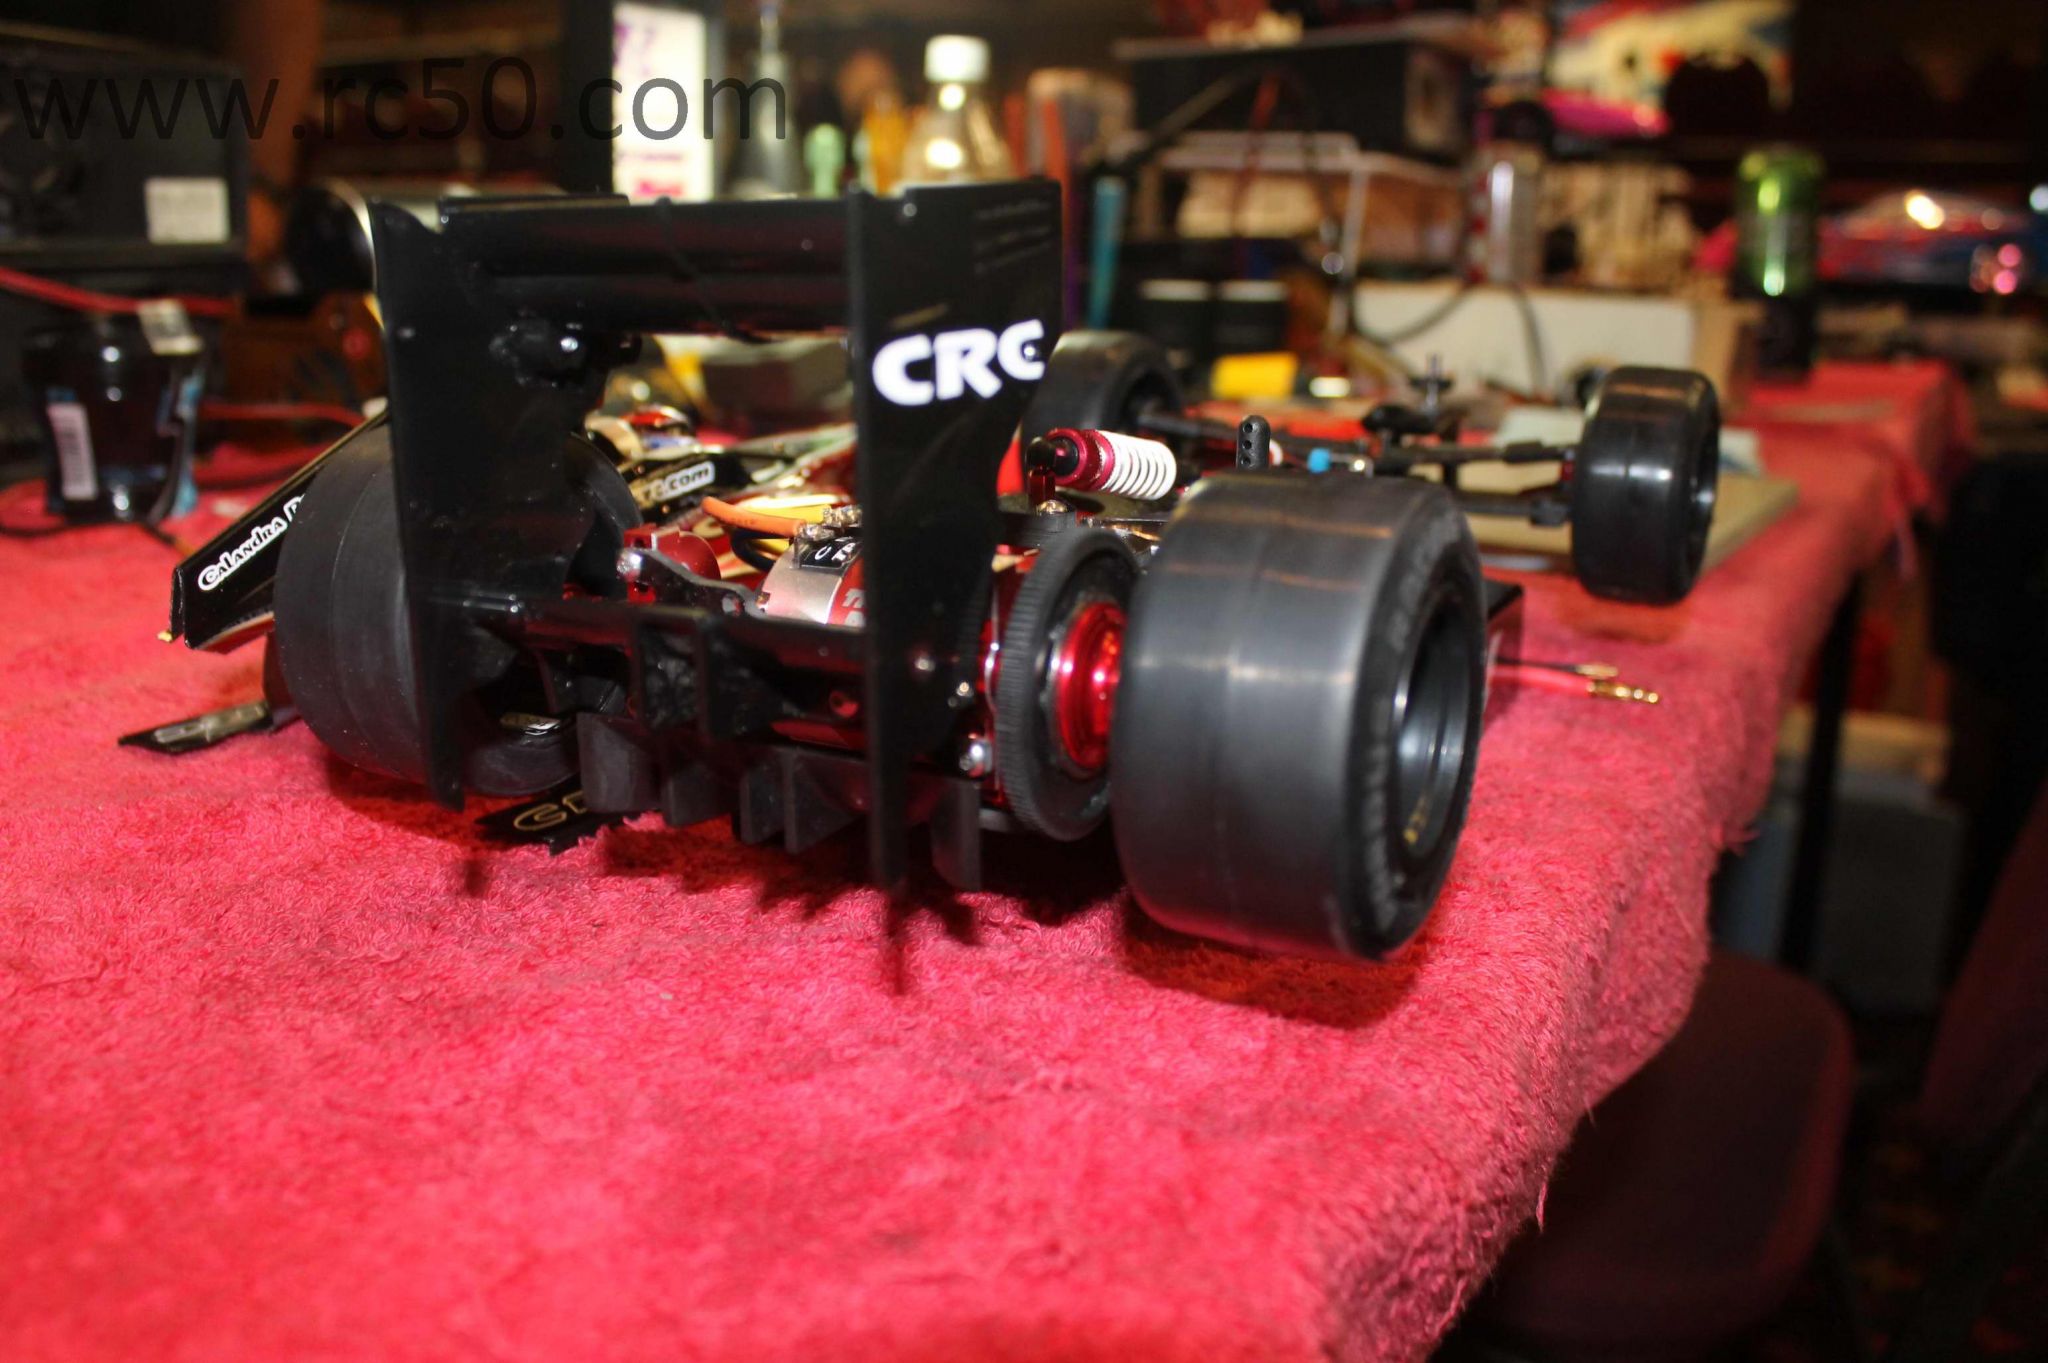
Those are the major changes needed to get the car running. I added a Tamiya axle and diff, along with a sedan shock. To mount the body using the separate side pods, a small slice needs to be made near the rear to clear the end of the upper deck where the tubes attach. If you use the body in one piece form, this probably is not necessary. I have not fitted it yet, but I think that the F104Pro body might be a nice choice in that the winglets on the side would hide the protruding parts.


As far as testing goes, once I finished the car, I turned it over to my buddy Kevin for testing. He brought it out to the carpet track on practice day. I wasn't able to drop by until later in the day, but he told me over the phone "You're not getting this car back unless you can find another one". It was pretty good out of the box. Initially it was set up with 2 o rings on the t bar and the tubes with 2000 wt diff oil. Kevin tried 30,000 wt oil in the tubes at the end of the day, but that was a bit much and the car wanted to traction roll from being too stiff.

The next week I took the car out and tried a few things as well. Kevin wanted to try the car with the F103 damper pucks just to see if it was any better. I ran it most of the day with the pucks and it was pretty good, but in the last couple runs I went back to the tubes, and for me anyway, the car seemed to drive better. I wound up with 7000 wt oil, and that was pretty good. I also changed the t bar setup to a .5mm spacer on the front screw and a stiff black Tamiya o ring on the back. We wanted to try to get the car a little flatter, and this worked well.

Overall, and with only a little time on the car, it is very good. You are limited on battery placement in the t bar configuration, but so far it has not been a big hindrance. On the plus side, the F103 style t bars are dirt cheap and offer a lot of options in setup (tilting the t bar, different types of o rings and spacers to control roll characteristics). I'm going to continue to work with the car as I think we have only scratched the surface.