I probably should have posted this a long time ago, but I did finally run the V2.V2 after a Gravity RC Midwest All Star Series race. I ran it with a 21.5 motor, as it was all I had available at the time. The track was the new CRC black carpet, and after a day of racing, had a nice groove.
There was really only time to run one battery, but I was very surprised. The car was actually really good for something that had a guess at the setup based on what I thought should work. It was a bit twitchy, but generally got around well, and didn't traction roll. I wasn't sure how it would react in the high traction, but it was fine. Even more interesting was that it was very easy to get on the power, even with the 21.5 motor. UF1 MIDWEST past champion/engineering genius Rick Vessel even gave it the thumbs up when he was passed the controller. The long links do seem to be doing their job of getting the car some traction.
At some point I'll continue to work with this car. Luckily, the new local track has now opened. There hasn't been an opportunity to practice locally in the past several months. I may not get to this right away, as the front end has migrated to another project, a very interesting prototype development...
Sunday, November 20, 2016
Wednesday, September 7, 2016
V2.V2 complete


I have not had a chance to run the car........ yet.
Friday, July 1, 2016
Basic geometry
So I have been thinking about a few things after a conversation at the track. Lately, I have been feeling like the biggest things on an F1 car outside of the tire selection are the car track widths, and the steering setup. I was talking to someone about what really gets F1 cars working. The steering is gigantic, but not everybody thinks much about it.
A few years ago a friend who was a long time 1/12 guy, and national level A main racer, among other things, really clued me into how steering geometry works on pan type cars. Working with the concepts he explained to me really opened up possibilities I did not know existed. Sometimes, there were things I wanted to change on the car that I didn't know how to get without big compromises, or even how to change at all. The steering on your car can actually affect almost all areas of set up, things that would be counter intuitive in some cases.
The big one is the bump steer settings. Generally, in a typical servo set up with the output shaft pointing up, you will use maybe 5mm of shims on the bottom of the servo saver. That will generally get the tie rods somewhat level. What is this really doing?
 In general, the less shims you use on the bottom of the servo saver, the more the car will want to steer on exit, from mid corner on. I have actually seen a car do pirouettes because the driver had NO shims under the servo saver, and an extreme angle upward toward the saver. (CAUTION: bad paint program diagrams ahead!)
 A more typical setup has some spacers underneath the servo saver to get the arms sort of level. A level tie rod will have a minimal amount of bump steer and make the car feel pretty much the same in all phases of the corner. Usually, this is the best approach to take at first. It's fairly easy to add or remove spacers in small increments like 0.5 or 1mm to tune things in. Big changes are good to familiarize yourself to the extremes, but remember to look at the tie rod length to maintain toe as close as possible!


A few years ago a friend who was a long time 1/12 guy, and national level A main racer, among other things, really clued me into how steering geometry works on pan type cars. Working with the concepts he explained to me really opened up possibilities I did not know existed. Sometimes, there were things I wanted to change on the car that I didn't know how to get without big compromises, or even how to change at all. The steering on your car can actually affect almost all areas of set up, things that would be counter intuitive in some cases.
The big one is the bump steer settings. Generally, in a typical servo set up with the output shaft pointing up, you will use maybe 5mm of shims on the bottom of the servo saver. That will generally get the tie rods somewhat level. What is this really doing?


Adding spacers to the servo saver making the tie rods run down towards the inside of the car will make the car steer more in the beginning of the turn. Additionally, spacers on the knuckle tend to make the car more reactive at first turn in as well. This does increase the angle of the rods as the spacers on the servo saver does, but I think that the difference in height from the axle is a little different from just adjusting the rod's angle in general.

The other factor in the steering is Ackermann. The difference in the steering radius of the two front tires generally affects overall steering and aggressiveness. Generally, moving the servo saver ball studs forward, whether by servo position or length of the servo saver/steering arm, will increase aggressiveness and steering. This will also kill some mid corner roll speed, especially on carpet. On asphalt, this can actually be a benefit, since it's almost like drag brake.

Making a straighter tie rod will promote roll speed in high bite conditions (note most 1/12 cars are fairly straight), and be less aggressive. Rubber tires do seem to like a bit of angle to make the tires work.

The other part of the equation is the actual servo saver. The width of the space between the ball studs makes a difference. Narrower spacing tends to be more aggressive. Wider less so.
The other part of the equation is the track width on both ends of the car.
At the front, I like a wider car in general. It promotes more on power steering, and helps the car be more stable under the brakes or on corner entry. Narrowing the front will make the car a bit more nervous, and help turn in. There is usually less overall steering, however. Having on power steering is key in my estimation since the car's corner speed is important to lap time since they do not have the acceleration of a 4wd car. I try to get the car as wide as rules allow, and the track conditions will permit.
As far as the rear I generally try to make the car narrow as conditions will permit, to gain rotation mid corner. It will also feel like there is more side bite as well. In high bite, like carpet, this can work very well. On asphalt, it pays to try to run as wide as you can while maintaining rotation. A wider rear will be more stable out of the corner (launch), and will keep the tires from overheating during the run. The overheating is less of a concern on carpet. In the past, the 190mm width limit led some option part manufacturers to make widening kits for cars. Enjoying some initial popularity, a lot of drivers wound up removing the kits and going back to stock width, looking for steering. As it turns out, just removing the rear end parts and leaving the front 190mm would have been even faster. Widening the rear of the car will lock it down and kill corner speed on a tight track, especially high traction carpet. I like to use 0.5 mm spacers on the axle to widen 1mm at a time. It's a change that you can feel but it's not too drastic.
To me, these are the basic settings after tires that will establish the overall feel and balance of the car, along with ride height. Most of the rest like springs, oil, camber are finer, but still important, adjustments. It's just that the things I have described about are more "macro" and will change the character of the car immediately. I hope this will help get more guys into the ballpark a little faster. Don't take my word for it, try it out!
Friday, June 3, 2016
TRF102 front end asphalt throw down show down!!!
The TRF101 180mm carbon front end parts are becoming somewhat popular among Tamiya TCS racers with the various F1 models due to the simplicity and less aggressive nature of it's geometry. I personally like it on the TRF102 for carpet. On pretty much any other model, for carpet racing, I prefer the standard F104 front end. My familiarity with it, and the amount of grip it produces in a higher traction setting has been an overall plus for me.
On asphalt, things are more of a toss up. Most of the Tamiya F104 models have a little mid corner/on power push when the front to rear balance is right, unless traction is very high. One of the most popular tire setups is the kit front, TCS (pit shimizu) rear combination. The reason for this is the more forgiving nature of the kit front tire vs. a very grippy TCS front.
The TRF102 changed this a bit, since the more flexible 2.5mm chassis gives the front end of the car more bite, and a lot more steering throughout the corner. This is my personal weakness, since more steering has always translated to speed for my driving style with the Tamiya cars. The problem is that this also makes the TRF102 a hard beast to tame if the rear end of the car is not locked in. Even if so, inconsistency and the dreaded traction roll can bite you...
I built and ran a TRF102 for the TCS nationals last year, which in hindsight may have not been the best decision. The car was great, and I think is an excellent design, but the amount of time between its release and the nationals was not really enough to fully dial in the car in relation to how familiar and comfortable I was with my F104WGP on asphalt. The temptation of the awesome steering feel was too much to overcome. The problem was a lack of spares in the thin T bar department, due to how new the car was, and the somewhat unpredictable nature of the car for me. Last year's champ Tyree Phillips certainly had no problem, winning with the 102, but he is also about 1500 miles closer to the Tamiya track than I am for testing sessions.
In any event, I was able to return to the Tamiya facility for the spring TCS regional race in a attempt to get some more testing there with the 102 car. While racing was not particularly successful with a 7th place finish, I got a lot of good feedback and testing in. I had decent pace very quickly, more so than any other visit to the Tamiya track. Even more important, I had a good car to bring back home and make comparisons at my home track.
While at Tamiya, I was able to check out past TCS champion Craig 'CUDA Hammond's TRF102, which he claimed to eclipse even his venerable championship winning F104 in "monkey car" ease of driving and crazy speed. His biggest departure from the norm was the carbon front end. I had a TRF101, but I was never overly impressed with the front end. That version of the carbon front end, a bit of a half measure featuring the plastic lower arms of the F104, never gave me the steering feel I was looking for. I had talked to some racers about the carbon front end, but nobody else seemed to have many conclusions either. Craig, however, was a believer... A believer who regularly hands out beatings, so I figured it would be worth a try. I got a second car, and I also happened to win a front end setup at a carpet TCS regional, to it all came together like it was meant to be.
In the opening weeks of the outdoor season at the local track, I brought out multiple cars to compare to the track tested stock TRF102 to get a baseline on performance. The 102 tuned for the Tamiya track was certainly the best car of the lot, with the carbon front end car (CFE) close, but definitely lacking some of the steering of the standard car.
Several weeks of testing between the two TRF cars resulted in the standard car remaining top dog. I did not change the standard 102 except tire prep to have a good idea of what a car that worked at the nationals's track would perform and feel like while I worked on the CFE car.
The only thing I did not like about the CFE TRF102 was that it didn't produce the lap times of standard car. It was quite a bit easier to get the car around, and got into the corner better under the brakes. It was also really consistent over a run. The standard 102 shined best when the traction was up; it lost out if the traction was lower, becoming inconsistent.
I built the CFE car to the instructions with the spacers included resulting in a ride height close to 6 mm. That may sound a bit crazy, but I wanted to run the front end the way the instructions said at first, and a little "motor boat" reverse rake will make a stable car. Besides, Craig's car was set up like that, so it's all good! However, I decided to try a little change to see if I could get some more speed and steering. I had a gut feeling that if I could get the car to roll through the corner a little better, it would be at least as fast as the standard car, but more docile. That would be especially important in varying traction.
I dropped the car down to 4.5 mm ride height, changing the lower arm spacers to 5 mm. I didn't change anything else. That may have also been part of what would come later.
The first run with the lowered car was after racing ended, at a time when the track usually loses a little bite. My best lap during racing with the standard car was a 19.0, and after the races it would not match that lap as the track went away. The CFE car was able to hit an 18.7 right away, better than anything I did all day. Even more impressive, I assumed that car would be slow based on feel. Easy to drive, but checking the lap counter after the run, the results were there. I immediately prepared the standard car again, thinking possibly the track had gotten better somehow. It would not break the 19 second barrier that run. The second run on the CFE car I lowered the rear axle one position as well, thinking it might help add just a touch of rear bite. That change resulted in a ridiculous 18.4 hot lap, 0.6 better than the standard car's best lap. That was totally exciting, to the point of concern that somehow the speed might not translate to the Tamiya America track later in the summer. I have been bitten in the past by the differences in track characteristics, but the more docile nature of the CFE car tends to bode well from my experiences at the nationals. Usually, my problems come form a more aggressive, but faster-at-home car.
What made the car so much faster?....I'm not 100% sure. The increased steering certainly was helped by lowering the car about 1.5 mm. The other factor may have been in the bump steer and ackermann. Raising the suspension arms did also raise the steering knuckle in relation to the servo saver. This usually biases the steering more toward corner entry. A car with the links much higher at the servo saver than the knuckle will bias toward corner exit steering, so much so that extreme settings can make the car pirouette on the nose. That change must have been fairly subtle anyway, since the car drove almost the same as it did before the changes.
It is of interest to note that lowering the car brought enough steering that I was able to reduce or eliminate doping the front tire. Typically I had sauced the entire front, but now 1/4 or no dope was plenty of steering. Reducing steering should not be a problem, and adding should simply be a matter of more sauce on the front end. That's also a positive sign, as a car that is good and can be tuned with small tweaks like tire sauce application will be consistent run over run during the day. The driver will be able to concentrate on learning to drive the car at 10/10 and really find the subtleties to wring out the best lap times.
In any event, the testing will continue, but the carbon front end is winning right now.
V2 thing...V2!!
I still have the V2Thing that I wrote about some time ago. I have run it a bit, but never put a ton of time into it. It has had ups and downs in the small amount of time I have run it, but mostly it has been about trying some new ideas.
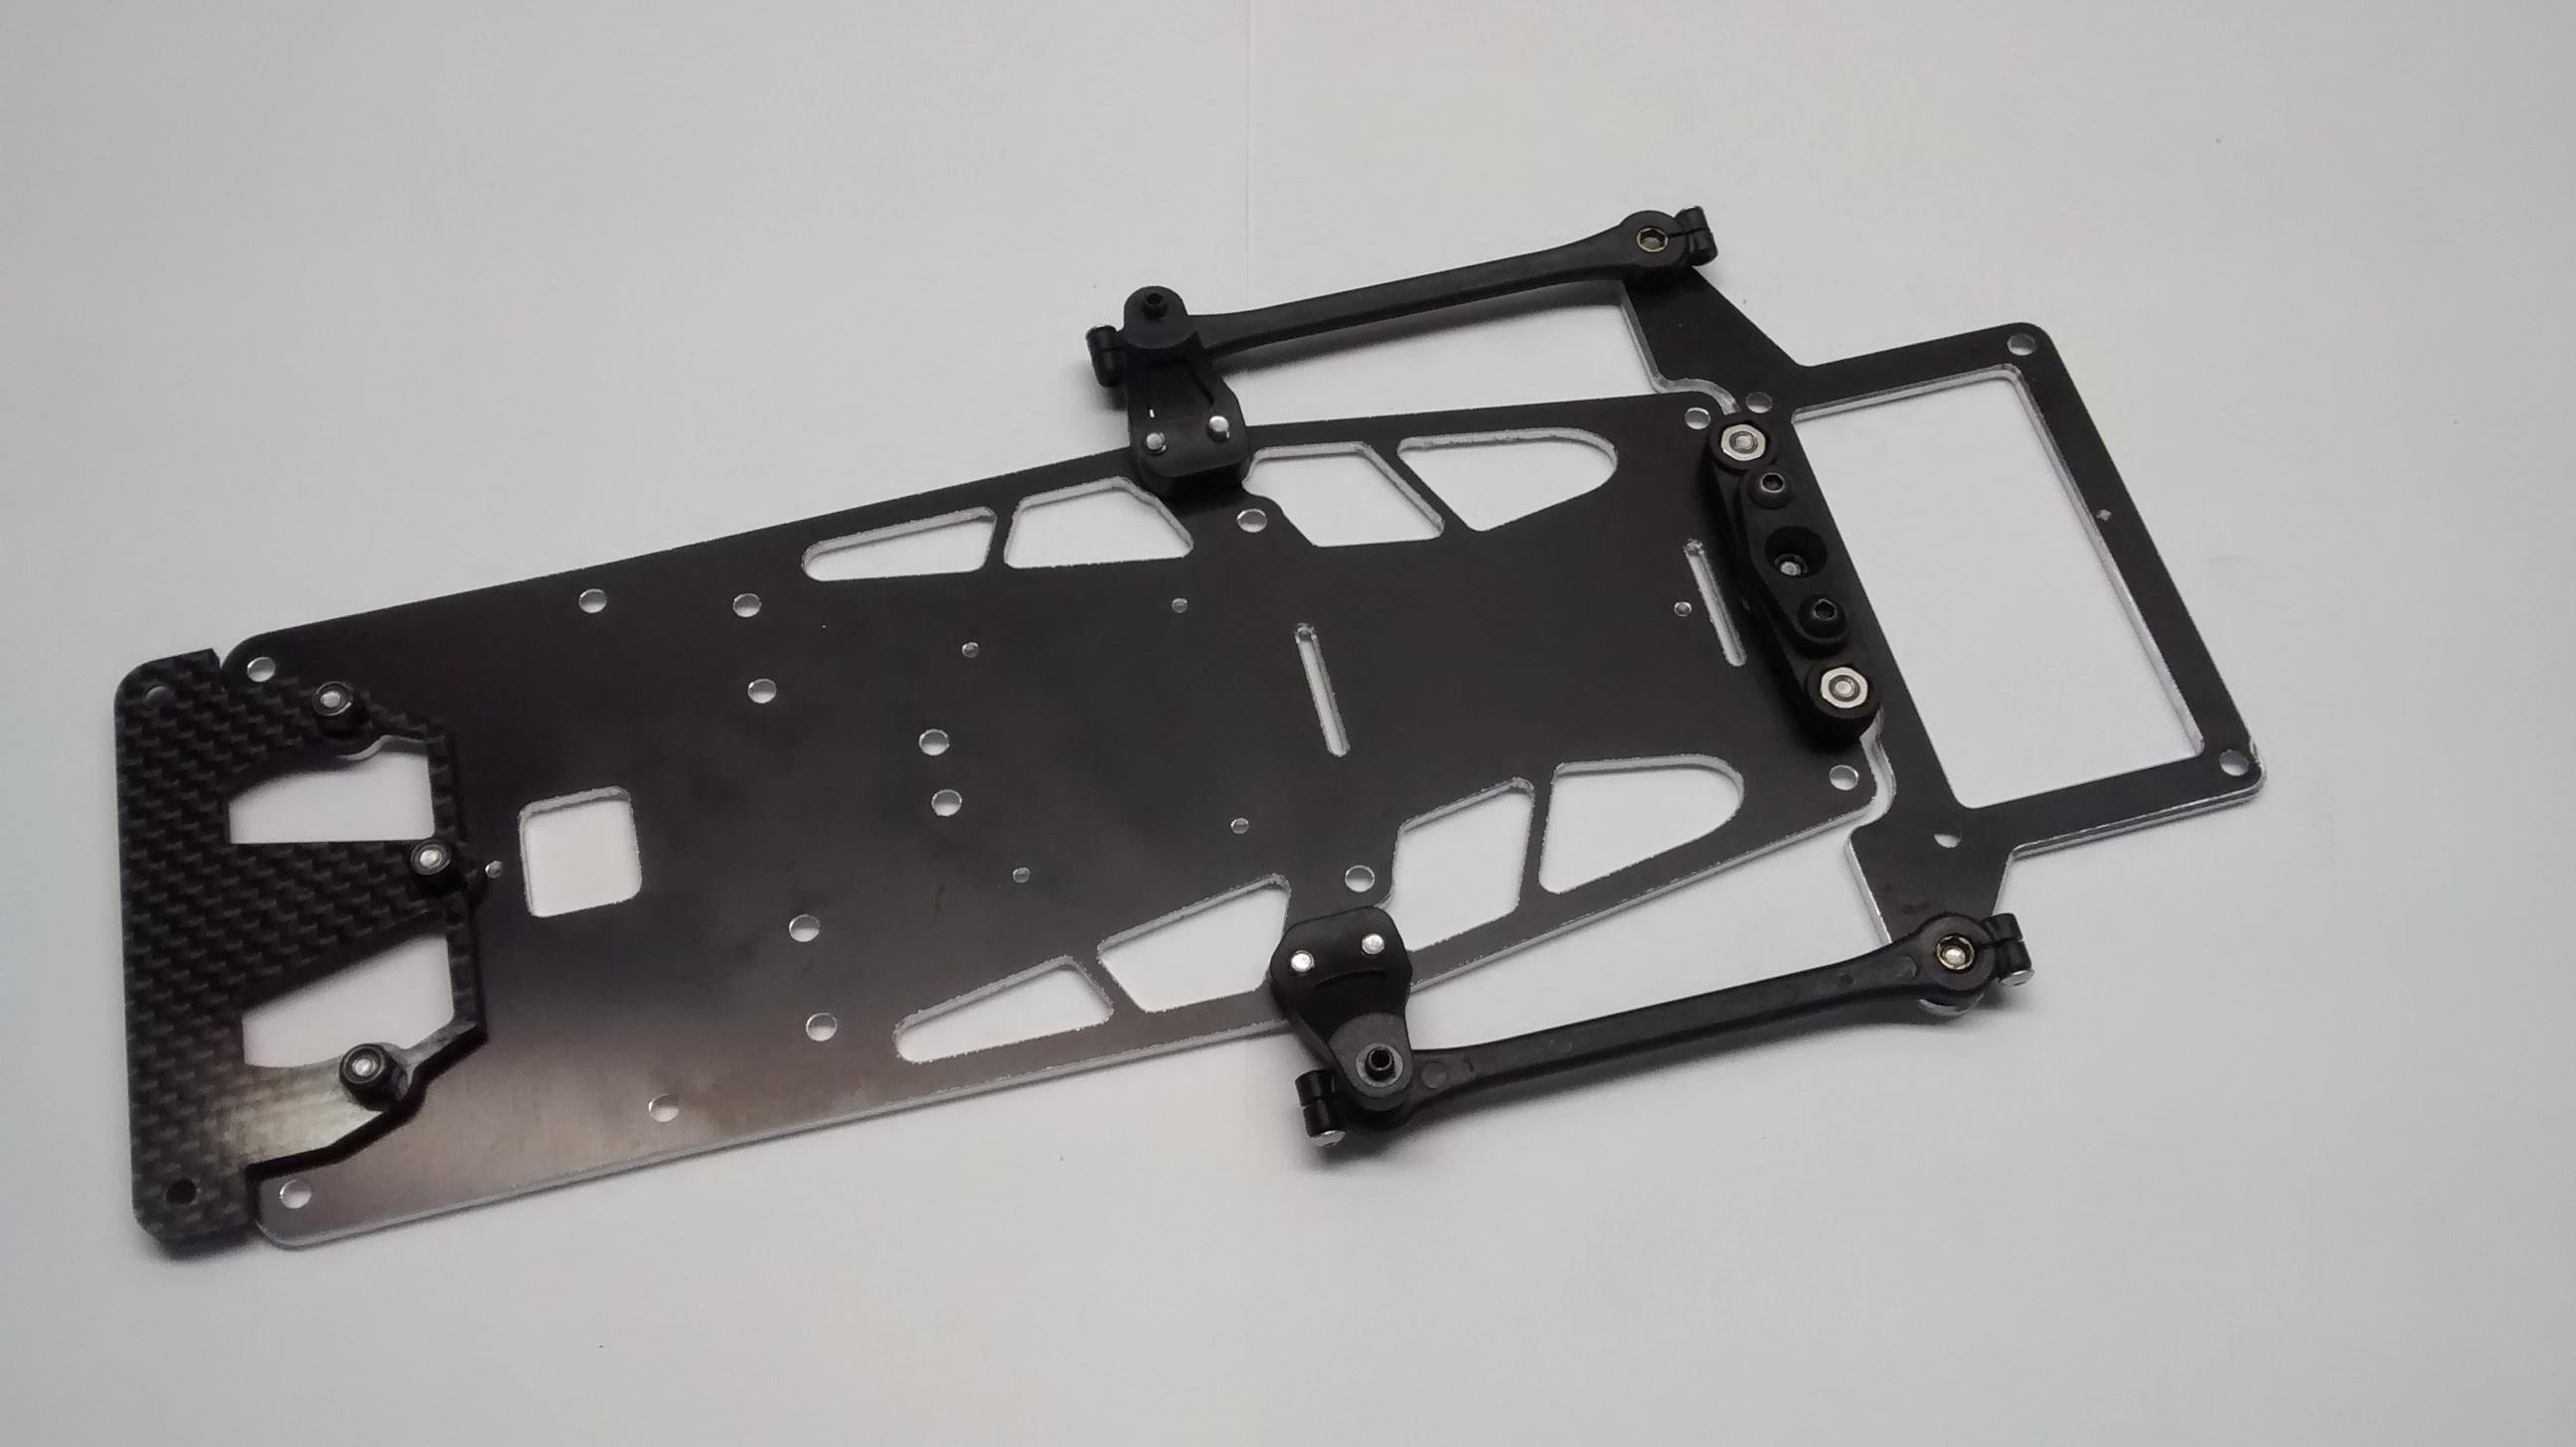


Not shown in the picture is the 3mm spacer used to bring the link back down to a level orientation with the pod end of the link
Once I get the whole car together, it should be fun to get a little track time and see what I can do with the revamped V2-V2!
Anyway, I have been thinking of a way to get a transverse pack into the car. Wider links would be needed. I did want to preserve the long, angled link premise I was working with.
Lately, a new 1/12 aluminum chassis conversion has popped up, utilizing the hanging link carriers from the Roche f1 car. The makers are claiming a great increase in corner speed due to reduced touch down/scrub in the corner.
So in that vein, I decided to make a little change in the V2 Thing that would kill two birds with one stone....

I had a scrap chassis that was perfect for making some hanging link mounts, along with some F201 shock crank posts that made nice standoffs. The F201 parts I had laying there, but Tuning Haus makes nice threaded standoffs in a variety of colors and sizes.
Now I have a super narrow chassis that will fit a transverse shorty pack, and approximately 8mm forward and aft movement for battery placement.

Not shown in the picture is the 3mm spacer used to bring the link back down to a level orientation with the pod end of the link
Once I get the whole car together, it should be fun to get a little track time and see what I can do with the revamped V2-V2!
Tuesday, May 17, 2016
Saturday, April 23, 2016


Wednesday, April 20, 2016
The Tamiya Carbon Front End and the TRF102
Ahh yes, the TRF102. Pretty dang good on asphalt. On carpet, hit or miss. The thing is, the chassis is thin compared to the rest of the Tamya line up, at 2.5mm. If the traction is up on carpet, it can get hard to drive.
I had brought the 102 with me to the TCS race at Access Hobbies in Springfield, Ohio in addition to the ever reliable F104WGP. I bounced back and forth between the cars during practice the day before the race. Towards the middle of the afternoon, temperature and humidity increased in the building and traction began to rise quickly. This brought out the wild nature of the TRF102, which can be a handful in these sorts of conditions. The car became very sensitive on the straight, and it did not put the power down very well out of the corners. The temptation of this car is, of course, the easy steering feel it has. If it can be tamed, the car should be faster than just about any of the other cars in the Tamiya line up as it steers far better throughout the corner. The problem is that much of this steering comes from the flex in the front of the chassis, which is a headache in high traction.
This is where the carbon front end comes in. Without the camber gain from the moving upper arm on the standard front end, and being made of much stiffer materials, the bite should be reduced overall.
I ran one pack with the standard front end. Traction was good on the track, and the car was a bit ill mannered. I switched out front ends, and started with silver springs not knowing what kind of bite I would get. I also went to the higher of the 2 camber settings, which I think is 2*.
The car was pretty good, but would lift the inside rear going into high speed turns. The front springs were too soft, so I went to the black spring, the heaviest. This made a big difference, and I also added a shim under the front knuckle to take a little droop out.
Both changes helped to flatten the car out. The car was much better, but it required a lot of steering throw to get around. I had an Xray servo saver on the car, so I added an Exotek ackermann extension to it. This part usually adds more bite to the front end, especially mid corner. I tried both settings available, and the most forward was a bit too much. The rear setting seemed a little better, not as hard to drive. Both the rear setting and the stock Xray servo saver produced similar lap times, and the plain Xray part may have actually been a little more consistent. It's the sort of thing that may take a little more testing to sort out, but I think ackermann changes will probably be an important part of the tuning arsenal for this front end.
On a carpet track, the front end made the car a lot better to drive, and got the lap times to a competitive level. On asphalt, I'm not sure if it would better subjectively, or just as a matter of taste in driving feel. I'm definitely going to find out, as I have seen the combination be on point outdoors. In any case, it's probably the front end to run for carpet if you want to use the TRF102.
Tuesday, April 19, 2016
Revisiting the TRF101
The TRF101 has been languishing on the shelf for a while now. I did have an initial good impression of the car, but it became apparent that the car just did not steer enough on carpet to be really fast. One thing I did notice was that it seemed to have better acceleration than most of the other Tamiya cars I had. That seems like a crazy thing to say, but maybe there is something to it.
One thing I noticed from Fred Medel's quote in an early post about the car was the mention in passing of the rear end and the car's stability: "With the TRF101 the car enters the turn with immense stability and there is no sign of the car wanting to continue to turn after applying throttle after the 180. It's just that stable. I believe this is the case because you now have a solid front end like the F103 on top of having the side links further apart."
That may be the key here - the width of the side links. The Xray style setup does have the battery sideways, but also ultra wide links compared to most of the Tamiya cars. Even more intriguing to me is the similarity to the SpeedPassion Sp-1. The rear end is almost identical, and I can say that the SP-1 made a lot of traction. The first time I ran it on asphalt, I was able to run the exact same laps and time I did as I did with the F104WGP I had been working on for quite some time. It was also very good on the not so good Pardus tires.
So maybe that stability helps the car put the power down. I was never a huge fan of the way the Version II F104 cars accelerated, but the 101 was good. Looking back, the thing that held the car back for me was the lack of steering . A simple change of the upper arms makes the front end the standard F104 spec, so it was worth a little investment of time to see if the TFR101 could be brought to life.
At the track, I first ran my F104WGP to baseline things, since I had just run it at the Access Hobbies TCS race. It was good there, so I figured the comparison would be good, especially since I planned to simply transfer the tires to the TRF car.
I was able to do a 9.7 hotlap, but that was sort of a freak lap. The rest of the laps were closer to a 10.0 average.
Putting the TRF car down, what I noticed right away was that it was really consistent. While I was a couple tenths off of the WGP car on average, I could knock out the same lap over and over. What the car was missing was quick transitioning in a couple S sections on the track. At first I had the car set up with the #2 plastic camber adjuster (.5* camber) and copper side springs, the softest. I had good success with the WGP car set to 2.5 camber, so I changed the TRF to 2.5 as well, and changed the side spring to gold, the second stiffest.
Now the car had the ability to transition quickly in the S sections. I was able to consistently do 9.9 and 10.0 second laps, and it still retained it's stability. I added a bit more front and rear droop as well which helped the car get a little more into the track. The best part was that I could stand on the brakes, which was important for the short chute in front of the driver's stand, and the end of the sweeper. I really enjoyed driving the car, as it was a dragster point to point.
In the next few runs, I tried some slight adjustments to the droop settings, to fine tune things. I also tried some of the other side springs, but settled again on gold. One thing that did make a difference was the center spring. I had tried a few, from the ultra heavy purple to a red sedan spring. What seemed to be best was a white sedan spring. The softer springs actually made the car a little unstable, and the really heavy one slowed it in the S turns.
One other option was the steel axle. For my style, I usually go a little faster with a steel axle, and it helped me as the car was now completely locked yet turned hard. Overall, I was surprised at how good this car was with a little time tuning it.
In the end, I feel like the results were unexpectedly good. The car was so enjoyable and worked so well, I just wanted to keep putting runs on it. My WGP car was really good at the TCS race I had attended, but I think my results might have been even better if I had run the TRF101. The consistency and corner speed were excellent. Really, this car just needed the standard F104 front end to come to life. I had been considering selling this car, but I think I may just hold onto it a bit longer....
Tuesday, April 12, 2016
Xray Aluminum Chassis Feedback
So after several races with the aluminum chassis on the new black CRC carpet, it's time for some thoughts...
Oddly enough, I sort of felt better about how the car set up with this chassis on the older gray CRC carpet. The first time it put it down, it was awesome. On the black carpet, it was a bit harder to nail the setup. However, this could also be partly due to the high bite at both the races I attended, especially the ROAR nationals in St. Louis.
Part of the problem at the ROAR race was a lack of mid corner steering. Going too aggressive with the front end would only result in a traction roll anyway, so my mistake may have been going with the least flexible front end parts on the aluminum chassis. I used the cross brace for the lower arms, and a pair of Xtreme racing lower arms which have extra bracing. I feel like that may have been what was limiting the car in the middle of the corner. Upon returning to my home track, which has the gray carpet, I went back to the standard lower arms and removed the brace. I felt like the car was a little more forgiving to get around the track. It was hard to tell how much this affected the mid corner steering, since the grip level was different, but at my track mid corner was good. I will return to the Ft. Wayne track in the next few weeks, so it will give a chance for me to revisit that issue.
I would like to point out that the eventual champion at the ROAR race and the rest of the local racers ran the graphite chassis on the car, and did not seem to have a big problem with traction roll. Sometimes the cars looked edgy at the start but they were able to manage that for the most part. Part of this may also have been the tire dope strategy. I noticed some guys doping their tires 15-20 minutes early, so that the compound would dry on the tires. I tried this as well and the car finished the race better. It also didn't seem to make the car any harder to drive. Letting the compound dry might have helped alleviate some of the initial oversteer/tire lifting that occurs when the tires are wiped just before the race.
In general, I think that the aluminum chassis makes the car very consistent, and reduces a lot of the tendency to traction roll. I probably went a little overboard on the stiffer components for the front end. I would imagine that the cross brace for the front end is not necessary in most cases with the aluminum chassis. The stiffer lower arms might be helpful depending on the level of traction. Being aware of how these parts affect the car, I'd like to test again on the black carpet. I should have a little more knowledge in a few weeks.
Sunday, January 31, 2016
The Aluminum Xray...and a note on the Serpent wing

After some races with the Xray X1 on the new CRC black carpet, I was interested in possibilities of stiffening the car overall. The X1 has shown it capabilities on various surfaces from asphalt to carpet. This versatility is great since the car will be competitive almost anywhere, but sometimes there are areas where specialized parts help.

Jan Rathiesky showed up at the first ETS race of the season - on carpet- with the aluminum chassis on his Xray. (photo - RedRC)
This is probably a hint.
Anyway, what stood out to me after a couple of these events on the high traction CRC black carpet was that the new CRC F1 with the transverse battery looked awesome...and it was also very flat on the track. It rarely seemed to pick up a tire or traction roll. CRC's website does make mention of the high stiffness weave of their chassis. The car also has a solid lower arm, which I assume is stiffer than the Xray lower arm.

In any event, I wondered if trying to remove some of the flex in the Xray car could help in high traction.
I was able to get an Xray aluminum chassis as well as front lower arms by Xtreme Racing. They sell a lower arm with additional bracing for some more stiffness. I added both these parts to my car, keeping the setup close to see what, if any, difference could be found. Note that the aluminum chassis is 2mm vs. 2.5, so the links and the "football" pivot need a 0.5mm shim to maintain the proper orientation to the stock pod plate.

At the track, I prepared the tires as I did with the original equipment. Putting the car on the track, I noticed the car did not have quite as much mid corner steering as it had before, but it was very flat as it went around the track. This was good as there was recently a well attended series race at the track on the same layout and traction remained very good, though not as high as the CRC black carpet. I also felt like the car was smoother and more predictable all the way around the track. I could drive in a more on power style as well, which I prefer. Adding 0.5mm to the rear of the upper arm for a total of 2.5mm of dynamic caster spacing added the mid corner steering I wanted. It seemed like the car held better corner speed, as I could roll down in throttle and the car didn't seem to bog or "stop" in the corner as it did occasionally before.
Overall, the car gained a more composed feel on carpet. As good as the Xray car is, there have been times where getting the amount of steering into the car to be competitive could make it a little unpredictable. During on of the races, a marshall commented on how good the car looked, and how easy to drive it looked as well. It was really good for how little I had to change in setup. In a couple weeks I'll be attending another race on the new CRC carpet so a real shake down will occur then. I'm sure I'll have some more thoughts about the new chassis.
Serpent wing update:
I mounted the wing to the graphite tongue I made with aluminum screws. PLEASE USE ALUMINUM SCREWS HERE! I had a harsh crash in practice at full speed, and one screw sheared off. Nothing else was damaged. The aluminum screws are like a fuse that will pop off in a very bad accident and save the wing and/or the graphite parts on your car! I also wound up using 5mm spacers to keep the wing off the track....

Sunday, January 17, 2016
Bulletproofing the Serpent wing
It appears the object was to keep the front wing lightweight at the attachment, and maintaining a realistic look. Both were achieved, but a good crash will crack the wing. I attempted to rebuild and re-enforce my broken wing with J-B Quick epoxy and a piece of carbon fiber, but it broke just as quick again on the next practice run.


At home, I thought about what could be done, and I realized that just the wing itself could be attached as the Xray lexan wings are. I was able to remove the old wing pylon and drill the wing element for an Xray bumper.

At that point, I decided that while the Xray bumper certainly would be secure, it would probably be a bit heavy, and possibly strange looking. I decided to use some scrap carbon fiber chassis material to make an attachment using the same hole pattern as the Xray bumper. This would allow me to use either the Xray bumper or the carbon fiber. Not a bad option if the carbon fiber did not pan out in testing.
It didn't take too long to make a little tongue to mount the wing to the chassis. Not only is it light weight, but it allows some flexibility in how high the wing is mounted as well via spacers underneath the wing element.


All in all, this worked out fantastically. I ran it all day at the local series race, and there were no problems. The wing proved very durable once the attachment was improved. I noticed the lighter Serpent wing gives a little more steering and response, so the carbon fiber attachment only improves this aspect. At some point I will try to make a better finished version, but this prototype piece worked in an excellent fashion.
Sunday, January 3, 2016
F1 Flow Chart
I made this post over at RC tech, but I figured I'd copy it over here before it winds up pages back on the thread....
F1 Flow Chart:
TCS racing?
If yes, see below, If no skip directly to "Buy XRAY"
Do You race on carpet? If no skip directly to "Buy TRF102"
If yes, this is where things start getting interesting.
F104 t bar cars - you need to really look at the F104X1 (or a car optioned to the same spec) or the F104W GP. The X1 has fiberglass chassis parts which actually can be a good thing. It makes a little more traction and has a little more weight down low, which again is not all bad. I have witnessed several brutal beatdowns on high grip carpet with this car. Pretty well optioned if you can get a kit/car. Really the only things you may want are the carbon axle, and clamping hub.
The WGP car is very similar, however you will need to buy the standard F104 front end plastic parts and shorter turnbuckles as the car is an older "wide" 200mm car with the included F103 front end parts. That being said, it is the most well optioned F104 in my opinion. All pod parts are aluminum, chassis is graphite, it includes the aluminum front knuckles, and the t plate I like better. The t plate has a different flex point which I think makes a little more traction. You may also fit any of the other F104 t bars as well, noting that the standard F104 cars cannot use the WGP's tbar due to the larger chassis opening required. Last time I checked you can still find this car for under $200 USD at rc-art online from Japan.
These cars don't turn in quite as hard as a TRF102, which has a much thinner chassis and flexes more in general. That's not always a bad thing, but I have always found that you need to keep a good balance in the car's handling to make it driveable. The car will feel either a little dead off the center of the wheel or it will get a little unstable if you want a steering machine. This is not a concern if you are only racing other Tamiya cars but you will be off the pace vs. Xrays or cars with a similar layout. (off topic excursion coming...) In my experience, and that of even other guys who I feel are better drivers than I am, you won't get the ultimate pace of the other brand chassis. I have been to non TCS races where we threw the kitchen sink at it and in the end you just make the car hard to drive trying to keep up.
The TRF101 has some nice features, including the ability to move the links around and has a little more flexible chassis than the F104V2. Oddly enough, I always had the feeling that it accelerated much better than the other cars in the series, why I don't know. I haven't tried to measue the pod or anything to see if there is some difference, but whatever.
I really don't care for the front end. There is little adjustment and the design is less than optimal to use what should be good features. If you let the upper arm flex too much, the kingpins can pop out. Ride height can be hard to set where you want it. No caster adjustment, like the normal F104 front end ( well not really true since you get more caster the less camber you run). It actually would have been super simple to add to the design via a couple extra holes in the upper arm, but that's neither here nor there. It's simple, and camber is easy to adjust to the 2 positions offered, but on carpet you wind up searching for steering most of the time. At least the F104 front end lets you have 6 camber settings and the ability to add dynamic caster like a 1/12 car with different height ball studs. The more stable handling has seemed to work for some on asphalt. Trying a set of the normal F104 upper arm parts might make this car a little better, but I have always liked the feel of the t bar's more stable launch out of a corner vs Tamiya's link cars.
Getting to the TRF102, the biggest flaw is the chassis if you are going to race carpet. I have gotten this car to within a couple tenths of my Xray car on carpet, which is pretty good since I feel like the Tamiya front end does not produce the steering of the Xray. You need to strap the battery to the chassis and also use double sided tape to make the battery a "stressed member" to help stiffen the car up for carpet. Otherwise, every corner is an adventure if traction is up. For non TCS racing you could fashion an upper deck from scratch or cut up F104 parts, as the holes line up. This is semi effective, but you will get crushed by Xrays and their clones anyway. The other problem is that a lot of the steering is actually produced by chassis flex just behind the servo, so you can't just make it a tank.
I think the TRF102 is probably going to work out for carpet if you use the battery to get the car stiffer. It does have a good amount of steering that just needs to be tamed. Work still needs to be done to get it 100% dialed for carpet, in my opinion. Otherwise, I would go with an F104WGP, which just has a different feel, and can be really fast as well, and has a lot of good setup knowledge out there.
__________________
Subscribe to:
Posts (Atom)